Build This Indestructible DIY PVC Pipe Dog Puzzle Feeder
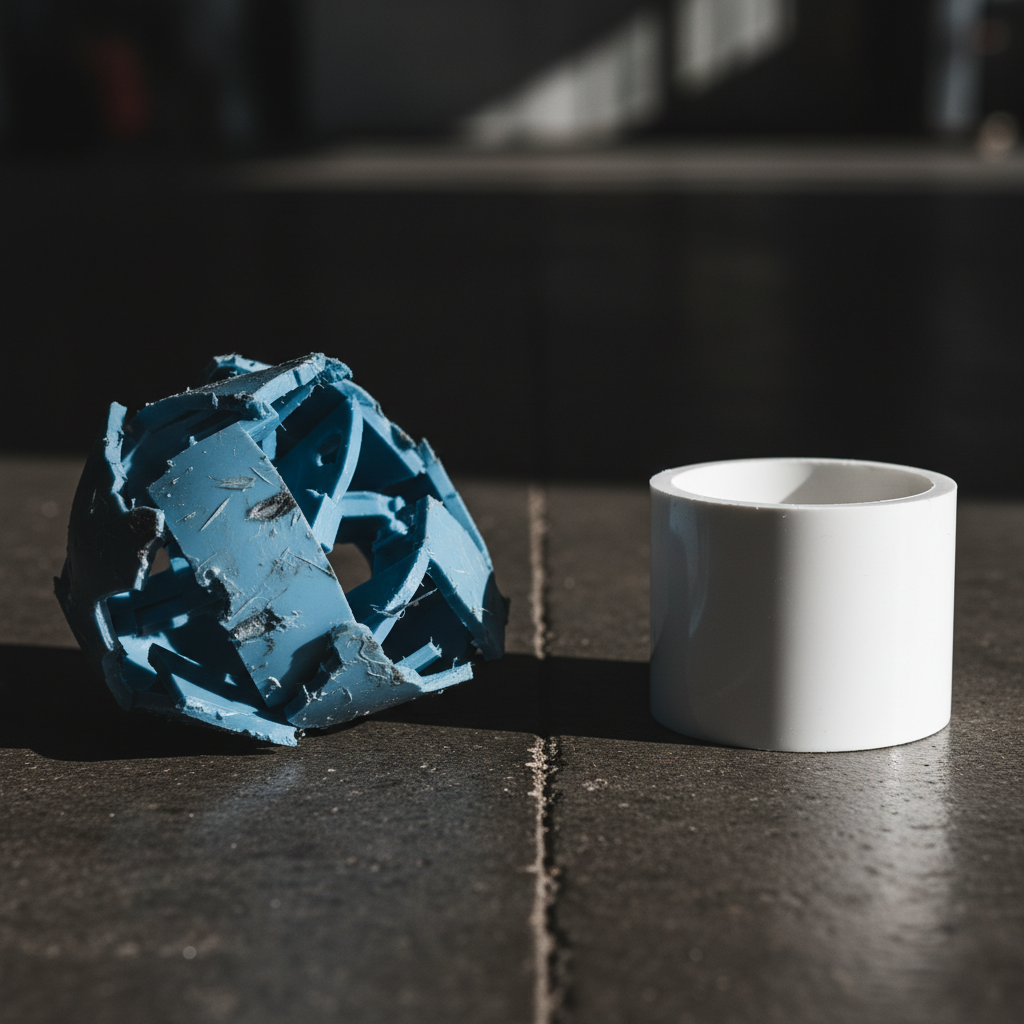
Walk down any pet store aisle, and you’ll be bombarded by a wall of colorful, cleverly marketed puzzle feeders. They promise to bust boredom, slow down fast eaters, and engage your dog’s brain. The price tags, however, promise to engage your wallet—often for a piece of thin plastic that a determined chewer can obliterate in a single session. This is the commercial puzzle feeder racket, and it’s time to opt out.
As The Canine Enrichment Hacker, my philosophy is simple: why pay a premium for planned obsolescence? Your dog’s mental and physical well-being deserves an investment, not a recurring expense. The solution is sitting in plain sight at your local hardware store. The indestructible DIY PVC pipe puzzle feeder is the single best investment you can make in your dog’s daily enrichment. It’s brutally effective, costs less than a designer coffee, and is tough enough to withstand the most enthusiastic power chewers. This guide will provide you with the no-nonsense, step-by-step blueprint to build a puzzle toy that will save you money and finally give your dog the durable challenge they crave.
The Commercial Puzzle Feeder Racket: A Cost vs. Durability Analysis
The pet product industry thrives on convincing you that specialized, expensive equipment is the only way to meet your dog’s needs. Puzzle toys are a prime example. They are often made from the cheapest possible plastic, designed with weak points that guarantee you’ll be buying a replacement sooner rather than later. Let’s break down the forensic evidence.
Most commercial feeders are made from injection-molded plastics that, while food-safe, lack the structural integrity to handle the compressive force of a dog’s jaw. Seams, sliding parts, and flimsy lids are all critical failure points. You’re not paying for durability; you’re paying for marketing and packaging. The real cost isn’t just the initial purchase price, but the cycle of replacement. A $25 toy that lasts two months costs you $150 a year. Our DIY version? It might cost $8 once. The math is undeniable.
Hacker Tip: Look at the negative online reviews for popular puzzle toys. You’ll see a recurring theme: ‘My dog destroyed this in 5 minutes.’ That’s not a product flaw; for the manufacturer, that’s a feature that ensures a future sale.
Let’s put the top-selling commercial options head-to-head with our DIY solution in a proper forensic breakdown.
| Feeder Type | Material Analysis | Average Cost | Hacker Durability Score (1-10) | Verdict |
|---|---|---|---|---|
| Popular ‘Wobbler’ Toy | Thin, brittle ABS plastic. Hollow design with a weighted bottom. Weak seam at the screw-off lid. | $20 – $25 | 4/10 | Fails against moderate to heavy chewers. The lid threads are the first point of failure. Overpriced for the material quality. |
| Sliding Puzzle Board | Polypropylene or composite wood. Multiple small, removable plastic parts. | $15 – $30 | 2/10 | A choking hazard waiting to happen. Not for unsupervised use. Easily chewed and destroyed. More of a one-time novelty than a durable tool. |
| DIY PVC Pipe Feeder | Schedule 40 PVC Pipe. Solid, thick-walled construction. No seams or weak points. | $5 – $10 | 9.5/10 | Virtually indestructible for 99% of dogs. The gold standard for durability and value. A one-time build for years of use. |
Safety Protocol: Your Non-Negotiable PVC Feeder Checklist

CRITICAL SAFETY DISCLAIMER:
Before you pick up a single tool, understand this: you are responsible for your dog’s safety. While this project is simple, negligence can lead to harm. This guide is for informational purposes only. Always supervise your dog with any new toy, including this one. Ensure the size of the feeder and the holes are appropriate for your dog to prevent choking or injury. We are building a durable tool, not an invincible one. When in doubt, consult a professional.
Choosing the Right Materials
Not all PVC is created equal. Your first priority is sourcing the right pipe. You’re looking for Schedule 40 PVC pipe. It has thick walls and is incredibly rigid. For sizing, use this as a general rule:
- Small Dogs (under 25 lbs): 1.5″ to 2″ diameter pipe.
- Medium Dogs (25-60 lbs): 3″ diameter pipe.
- Large/Giant Breeds (60+ lbs): 4″ diameter pipe.
The goal is a pipe that is too large for the dog to get their jaw around. This forces them to roll and nudge it, not chew or crush it.
The Art of the Smooth Edge
The single most critical safety step is finishing the edges. When you cut PVC and drill holes, you create sharp, potentially harmful burrs and edges. These MUST be sanded down until they are perfectly smooth to the touch. Run your finger along every cut and every hole. If you can feel a sharp point, you are not done sanding. This prevents any risk of cuts to your dog’s mouth, gums, or tongue.
Insider Secret: Many hardware stores sell PVC labeled ‘NSF-61’ or ‘NSF-PW’, indicating it’s certified safe for drinking water (Potable Water). While not strictly necessary for a toy, choosing this type of PVC provides an extra layer of assurance that it’s free from harmful chemicals.
The Blueprint: Your Arsenal of Tools and Materials
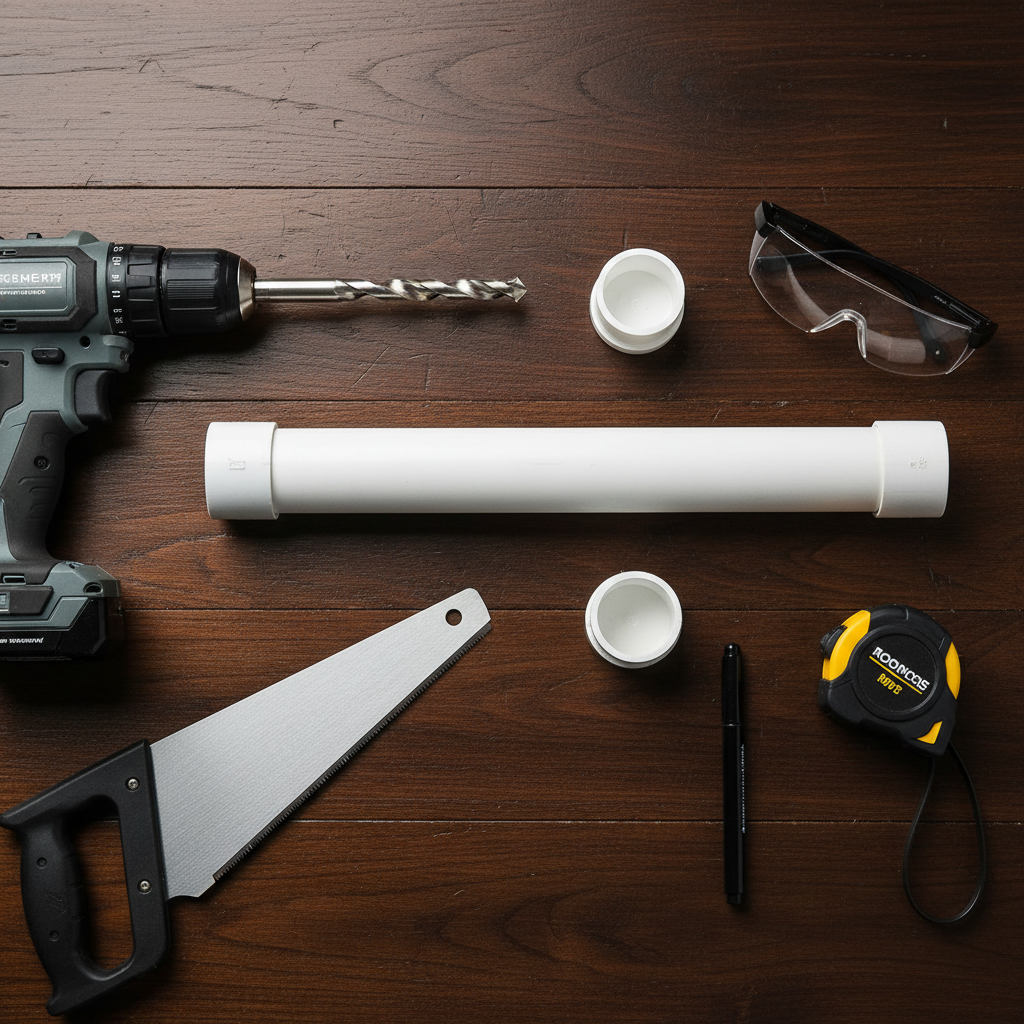
Building this feeder requires a minimal investment in tools and materials, most of which you may already have. This isn’t complex woodworking; it’s simple, effective assembly. Here is your complete checklist.
Required Materials:
- Schedule 40 PVC Pipe: One section, 12-18 inches long. See the sizing guide in the Safety Protocol section.
- PVC End Caps: Two caps that fit the diameter of your pipe. You want a snug fit, but avoid gluing them. One will be removed for filling.
- Pet-Safe Soap/Cleaner: For the final, critical cleaning step.
Required Tools:
- Saw: A simple hacksaw is perfect. A PVC pipe cutter offers the cleanest cuts if you have one.
- Power Drill: Any standard drill will work.
- Drill Bits: A variety of sizes. For example, 1/4″, 1/2″, and 3/4″. The variety is key to the puzzle’s effectiveness.
- Sandpaper: Medium grit (around 120-grit) is ideal.
- Measuring Tape & Marker: For accurate cuts and hole placement.
- Safety Glasses: Non-negotiable. Protect your eyes from plastic shavings.
Hacker Tip: Don’t want to buy a saw? Most home improvement stores will cut the PVC pipe to your desired length for free or for a very small fee in the plumbing aisle. Ask an employee, and you can walk out with a perfectly cut piece ready for drilling.
Real Cost Breakdown
Let’s see how little this fortress of a toy actually costs. Prices are approximate and may vary by location.
| Item | Estimated Cost | Notes |
|---|---|---|
| 2-foot section of 3″ Sch 40 PVC Pipe | $4.00 | You’ll likely have some left over for a second toy. |
| 3″ PVC End Caps (x2) | $3.50 | This is often the most ‘expensive’ part. |
| Sandpaper (single sheet) | $0.50 | You only need a small piece. |
| Total Estimated Cost | $8.00 | A fraction of the cost of a single, less durable commercial toy. |
Assembly Line: Building Your Puzzle Feeder in Under 30 Minutes
Follow these steps precisely for a safe and effective final product. The entire process is straightforward and should take less than half an hour from start to finish.
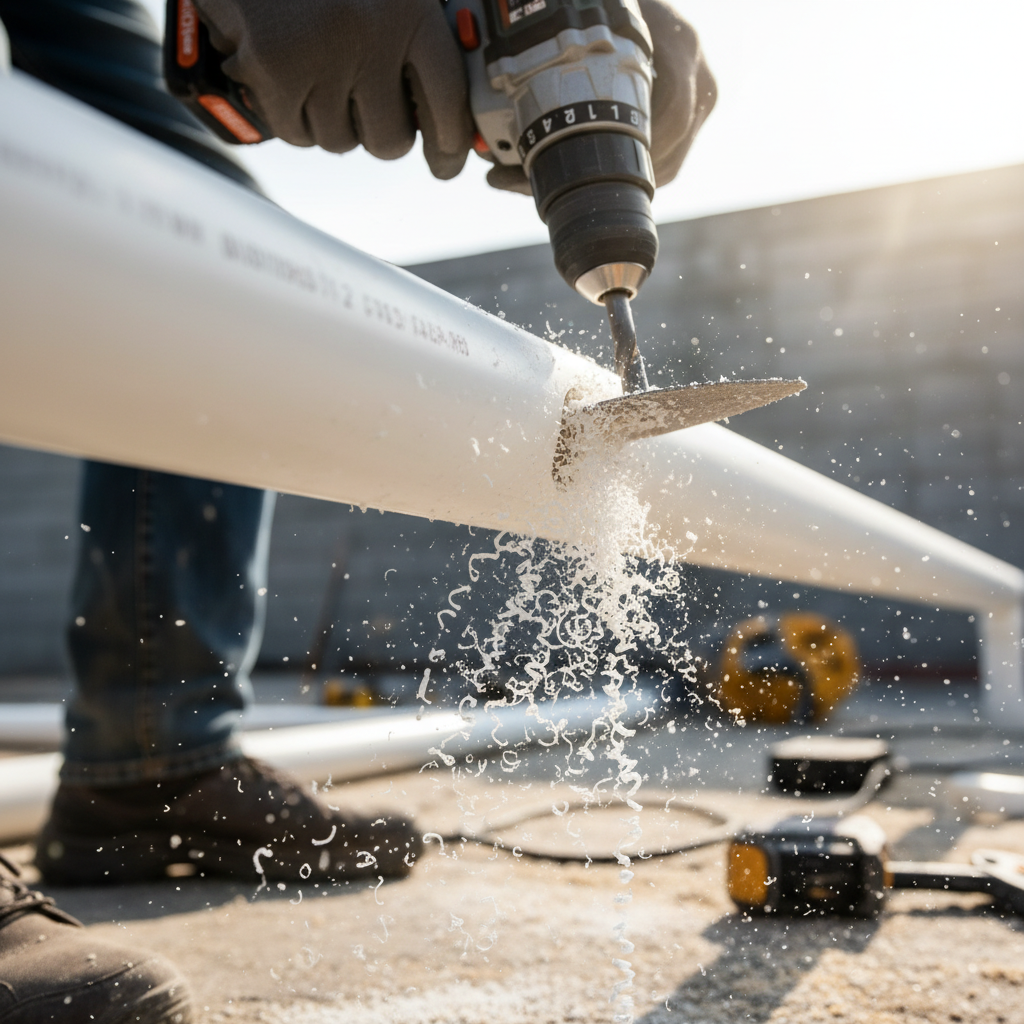
- Measure and Cut Your Pipe: Using your measuring tape and marker, mark your desired length on the PVC pipe. A good starting point is 12-14 inches. A longer pipe is more challenging. Secure the pipe and use your hacksaw or PVC cutter to make a straight, clean cut.
- Deburr and Sand the Ends: Immediately after cutting, the ends will be rough. Take your sandpaper and thoroughly sand the inside and outside edges of both ends of the pipe until they are completely smooth. There should be no jagged pieces of plastic.
- Plan Your Hole Pattern: Place the pipe on a flat surface. Using your marker, randomly mark spots for the holes all around the pipe. Don’t put them in a straight line. The goal is unpredictability. Plan to use a mix of your different drill bit sizes. Crucially, ensure the largest hole is smaller than your dog’s jaw or tongue to prevent them from getting stuck. The holes should be slightly larger than the kibble or treats you plan to use.
- Drill the Holes: Put on your safety glasses. Secure the pipe firmly (a vise is helpful, but not required) and begin drilling the holes you marked. Start with a smaller drill bit and work your way up if needed. Apply steady pressure. The PVC will create shavings, so do this in an area that’s easy to clean.
- The Final, Critical Sanding: This is a repeat of step 2, but for every single hole you drilled. Carefully sand the inside and outside edge of every hole. This is the most important step for ensuring the toy is safe for your dog’s mouth. Be meticulous.
- Thoroughly Wash and Dry: Take the finished pipe and both end caps to a sink. Use a pet-safe soap and hot water to scrub the inside and outside of the pipe, removing all plastic dust, shavings, and any manufacturing residues. Rinse thoroughly and allow it to air dry completely.
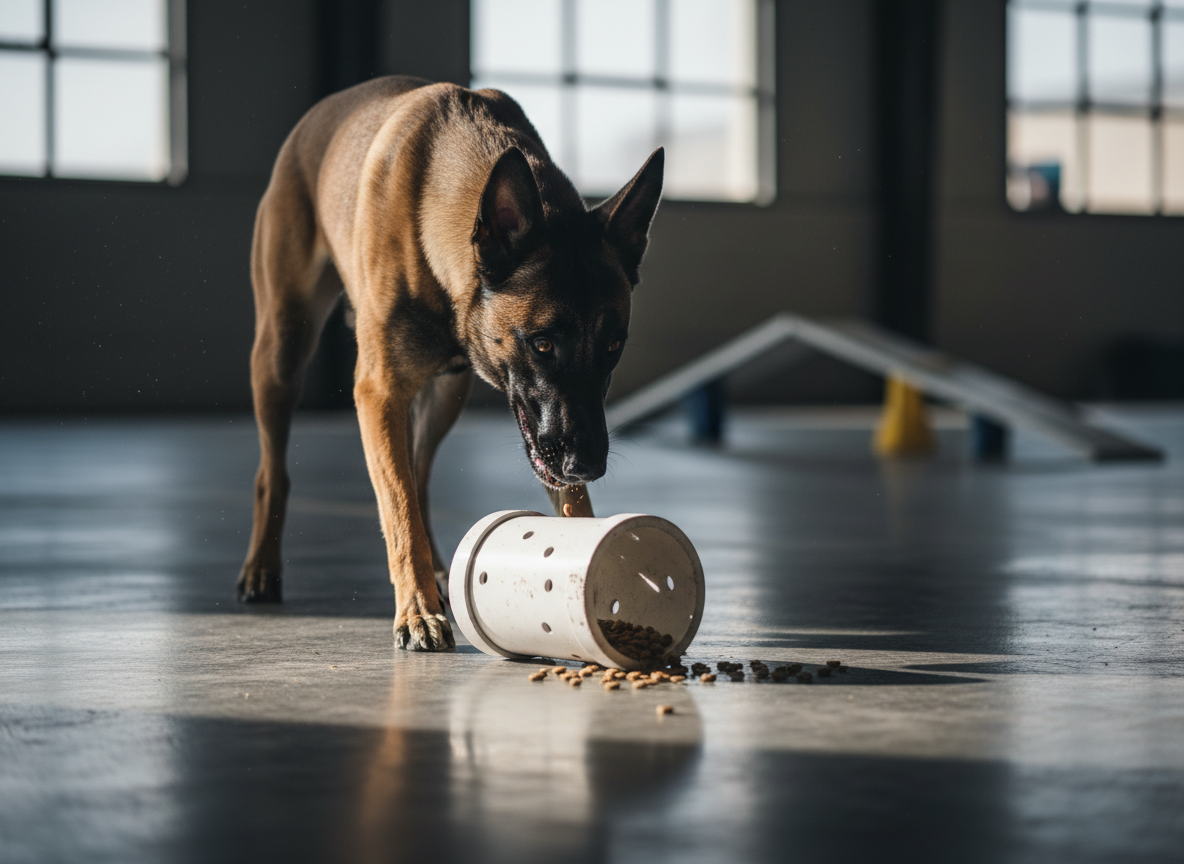
- Final Assembly: Once dry, fill the pipe about one-third full with your dog’s favorite kibble or some high-value treats. Place the two end caps on either end. Ensure they are snug. You have now built the world’s toughest puzzle feeder.
Level Up: Advanced Modifications for the Super-Genius Dog

For some dogs, the basic model will provide a lifetime of challenge. But for the canineEinsteins out there, you may need to increase the difficulty. The beauty of this DIY project is its infinite customizability.
Difficulty Tweak 1: The Hole Game
The easiest way to adjust the difficulty is by manipulating the holes. Start with more holes (10-12) of a generous size. As your dog gets better at it, you can either tape over some holes with a strong, non-toxic tape (like electrical tape) or, even better, build a second ‘expert level’ pipe with fewer (5-6) and smaller holes. This requires more precise manipulation from your dog.
Difficulty Tweak 2: Internal Obstructions
To really challenge your dog, you can add internal obstacles. Find a smaller diameter PVC pipe (e.g., a 1″ pipe inside a 3″ pipe). Drill a hole through both the outer and inner pipe and secure the inner pipe with a stainless steel bolt and nut. This creates an internal rattle and barrier that the kibble has to navigate around, dramatically increasing the complexity.
Difficulty Tweak 3: The Labyrinth
For the ultimate challenge, you can connect multiple pipes using PVC elbow and ‘T’ joints (do not use PVC cement). Create a zig-zag or ‘U’ shaped feeder. The dog now has to figure out how to manipulate a more complex shape to get the food to travel through the different chambers and out of the holes. This turns a simple toy into a multi-stage puzzle.
Hacker Tip: Vary the ‘payout’ to keep your dog engaged. Mix low-value kibble with a few pieces of high-value, fragrant treats like freeze-dried liver. The scent will keep them working, and the occasional big reward will supercharge their motivation.
Conclusion
You have now bypassed the expensive, disposable market of commercial dog toys and created a superior tool for a fraction of the cost. This isn’t just about saving money; it’s about taking control of your dog’s enrichment and providing them with a safe, durable, and highly stimulating activity that caters to their natural instincts. By investing 30 minutes and less than ten dollars, you’ve built something that will outlast dozens of store-bought toys and provide countless hours of healthy engagement.
That is the Canine Enrichment Hacker way: identify the problem, expose the racket, and engineer a better, more efficient solution. Welcome to the club. Now go let your dog enjoy their new favorite toy.