How to Make Safe Chicken Jerky for Dogs in Your Oven
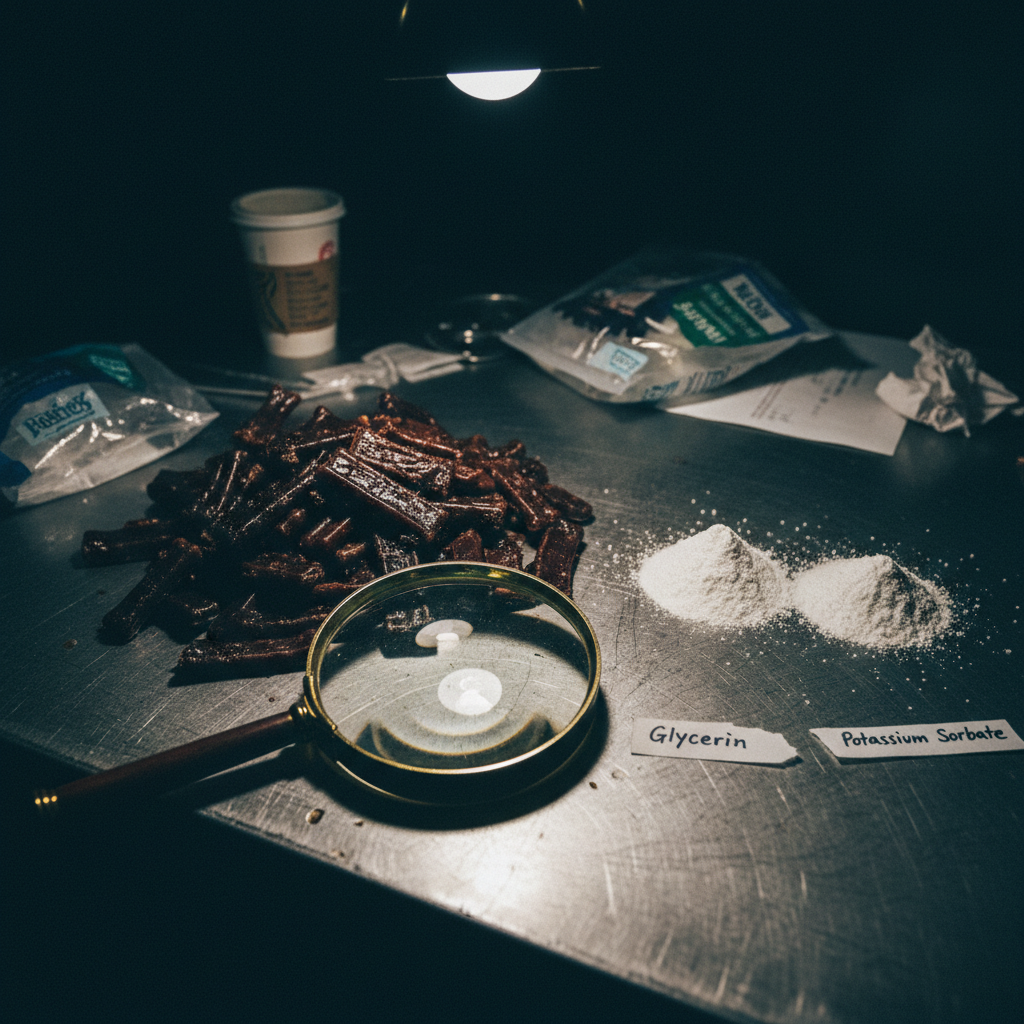
Let’s get one thing straight. The commercial dog treat aisle is a minefield of deceptive marketing, questionable ingredients, and outrageous markups. As The Canine Nutrition Hacker, I’ve spent years dissecting labels and what I’ve found is alarming. Many popular chicken jerky brands are packed with glycerin to keep them artificially moist, propylene glycol (a cousin of antifreeze), and a cocktail of unpronounceable preservatives. Worse, many have been linked to safety recalls, particularly those sourced from overseas.
Why would you pay $20 for a small bag of chemical-laden junk when you can make a massive batch of pure, single-ingredient jerky for a fraction of the price? Making your own isn’t just about saving money; it’s about seizing absolute control over your dog’s health and safety. It’s about knowing with 100% certainty what goes into their body. This guide is your blueprint to bypassing the entire corrupt system.
CRITICAL SAFETY DISCLAIMER
Before we begin, understand this: I am a canine nutrition analyst, not a veterinarian. This recipe is for a supplementary treat and should never be used to replace a complete and balanced diet. Treats should not constitute more than 10% of your dog’s daily caloric intake. Always consult with your veterinarian before introducing new foods into your dog’s diet, especially if they have underlying health conditions. You are solely responsible for the safety and preparation of the food you provide to your pet.
The Commercial Jerky Conspiracy: Why You Must Go DIY
Walk down the treat aisle and you’re bombarded with slick packaging featuring happy dogs and words like ‘natural’ and ‘premium.’ It’s a carefully constructed illusion. Let’s pull back the curtain and analyze what you’re actually buying. The first five ingredients on a label tell you almost everything you need to know, as they make up the bulk of the product.
The Filler-Ingredient File
Here are common culprits found in mass-market jerky treats:
- Glycerin/Vegetable Glycerin: A humectant used to keep jerky soft and chewy. While generally recognized as safe, it’s a cheap filler that adds sweetness and moisture, masking the true quality (or lack thereof) of the meat.
- Propylene Glycol (PG): A controversial ingredient that is banned in cat food but still permitted in dog food. It’s another humectant that prevents the product from drying out. Do you really want an ingredient related to antifreeze in your dog’s treats?
- ‘Natural’ Smoke Flavor: This is not smoke from a real fire. It’s a liquid concentrate created in a lab. It adds no nutritional value and is simply used to make low-quality meat more appealing.
- Salt & Sugar: Often added in high amounts as preservatives and flavor enhancers. Your dog does not need extra sugar or salt, which can contribute to a host of health problems over time.
- Potassium Sorbate & Sodium Nitrite: Chemical preservatives used to extend shelf life. While effective, their long-term health implications are a subject of ongoing debate. Pure dehydration is a natural preservation method that makes these chemicals entirely unnecessary.
Hacker Tip: If you can’t pronounce an ingredient or wouldn’t eat it yourself, it has no place in your dog’s treat jar. The best jerky has one ingredient: Chicken.
Real Cost Breakdown: The Hacker’s Analysis
The markup on commercial jerky is astronomical. You are paying for marketing, packaging, and a long supply chain. Here’s a direct comparison for a hypothetical 50lb dog, assuming a small daily treat.
| Metric | Premium Store-Bought Jerky | DIY Hacker Jerky |
|---|---|---|
| Source Ingredient | Chicken of unknown origin/quality | Human-grade, boneless, skinless chicken breast |
| Cost per Pound (Approx.) | $30 – $50+ (finished product) | $3.00 – $5.00 (raw ingredient) |
| Yield from 1lb Raw Chicken | N/A | Approx. 0.33 lbs of finished jerky |
| Cost per Ounce (Finished) | $1.87 – $3.12 | $0.56 – $0.94 |
| Verdict | Vastly overpriced for often inferior, additive-filled product. | Over 65% cheaper for a 100% pure, safe, and superior treat. |
The Arsenal: Sourcing and Prepping Your Chicken for Maximum Safety
Your final product is only as good as your starting ingredient. This is where you have the ultimate advantage over commercial manufacturers. You control the quality from the very first step. Don’t compromise here.
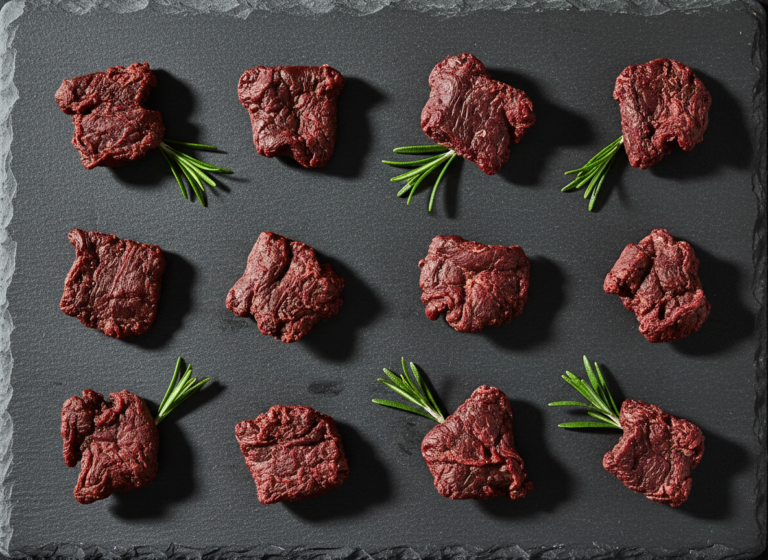
Choosing Your Weapon: The Right Cut of Chicken
The ideal cut is boneless, skinless chicken breast. It’s lean, easy to work with, and yields a consistent final product. While you could use thighs, they have a higher fat content which can cause the jerky to spoil much faster. Fat does not dehydrate well and will go rancid. For this reason, you must be meticulous in your preparation.
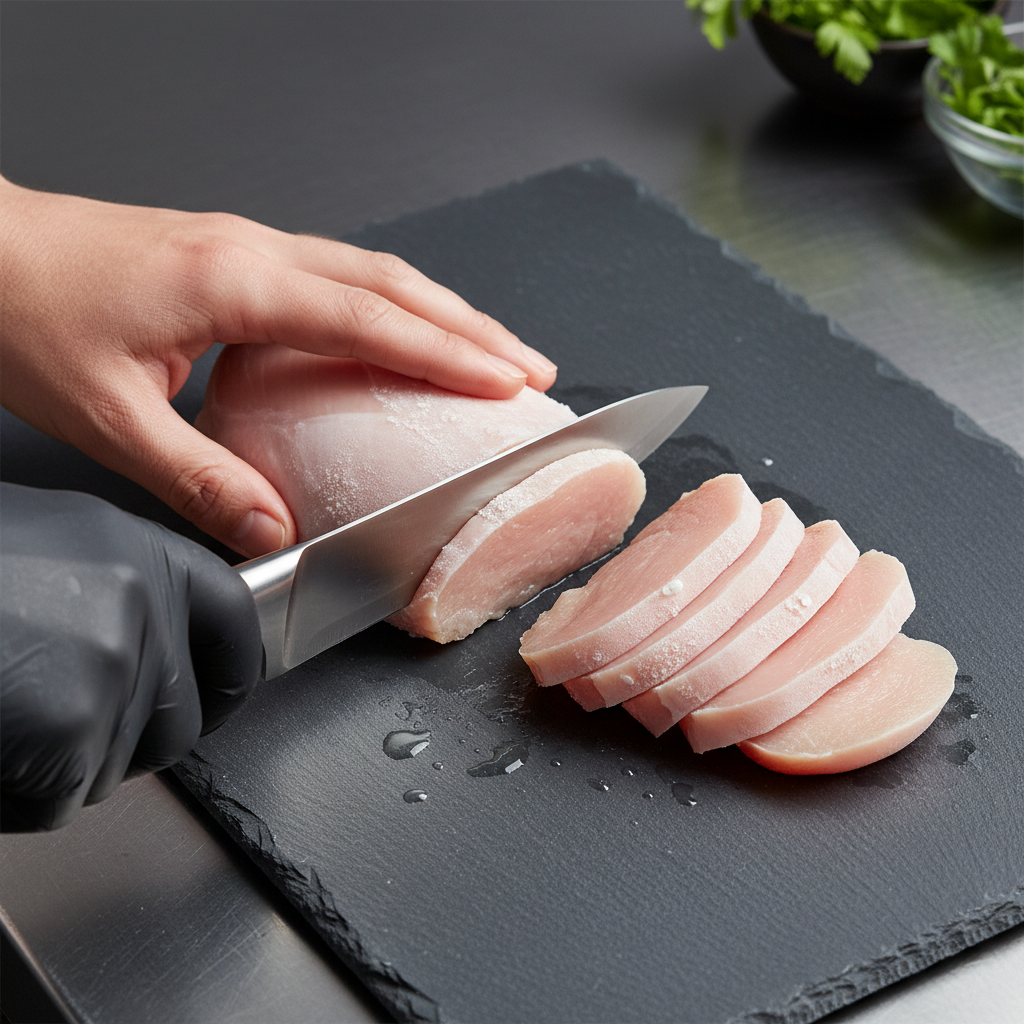
The Non-Negotiable Step: Trimming the Fat
This is the most critical part of the prep phase. Using a sharp knife, trim away every visible piece of fat, gristle, and connective tissue from the chicken breast. Every speck of fat you leave behind is a potential point of failure where spoilage can begin. Be ruthless. A clean, lean piece of meat is your goal.
Slicing Techniques for the Perfect Chew
Uniformity is key to even drying. If your slices are all different thicknesses, some will be brittle while others remain dangerously under-dried and moist. The ideal thickness is between 1/8 and 1/4 inch.
Insider Secret: Place the trimmed chicken breasts in the freezer for 30-45 minutes before slicing. This firms up the meat significantly, allowing you to make clean, precise, and perfectly uniform cuts with ease. It’s the single best trick for perfect jerky.
When slicing, you have two options:
- With the Grain: Slicing parallel to the muscle fibers will result in a much chewier, tougher jerky. This is excellent for power-chewers as it gives them more of a workout.
- Against the Grain: Slicing perpendicular to the muscle fibers will create a more tender, brittle jerky that is easier to break apart. This is a better choice for senior dogs, small breeds, or for use as a training treat that can be easily snapped into smaller pieces.
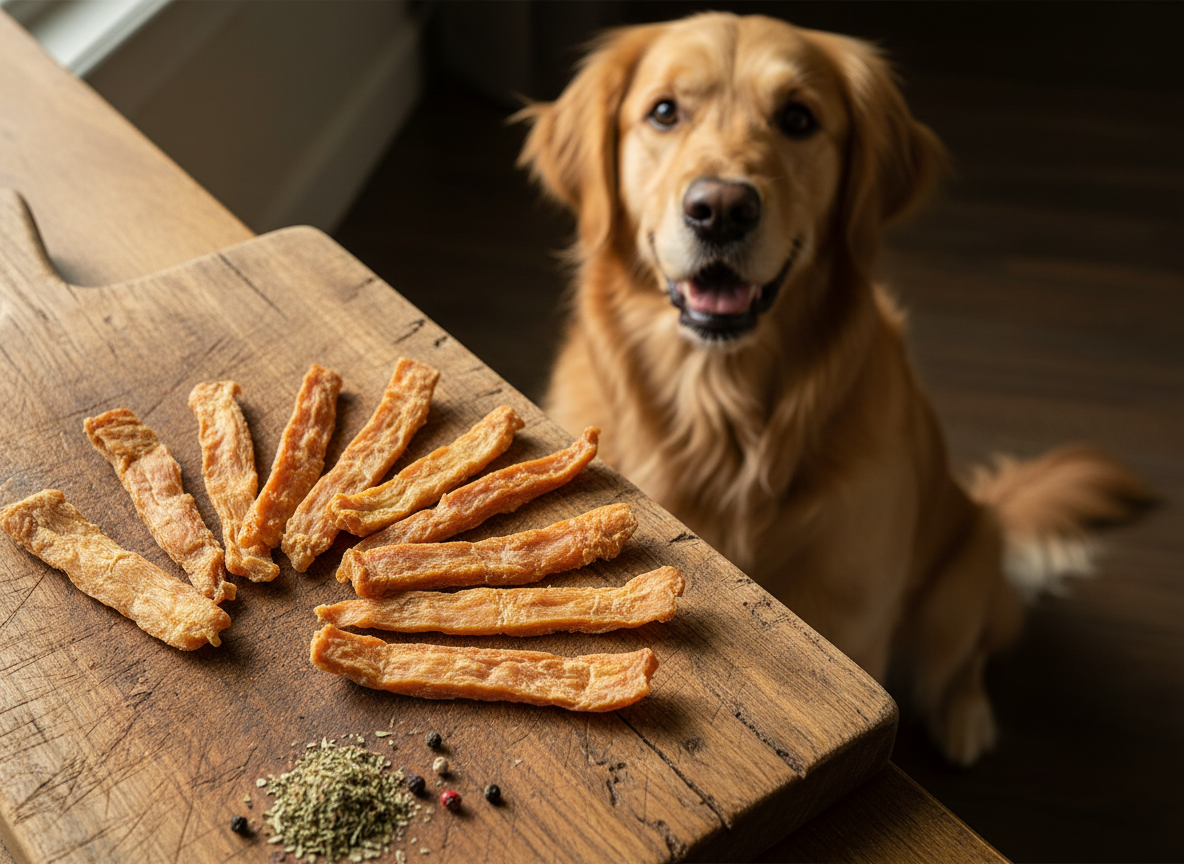
Aim for long, consistent strips. The chicken will shrink by more than half during the dehydration process, so what looks large now will become the perfect-sized treat later.
The Blueprint: The Step-by-Step Oven-Drying Protocol
This is where the magic happens. Your oven is about to become a highly efficient dehydrator. The principle is simple: low temperature and good air circulation for an extended period to slowly remove moisture, which is what bacteria need to thrive. Do not be tempted to crank up the heat to speed up the process; you will cook the chicken, not dehydrate it, resulting in a rubbery, unsafe product.
Here is the exact protocol:
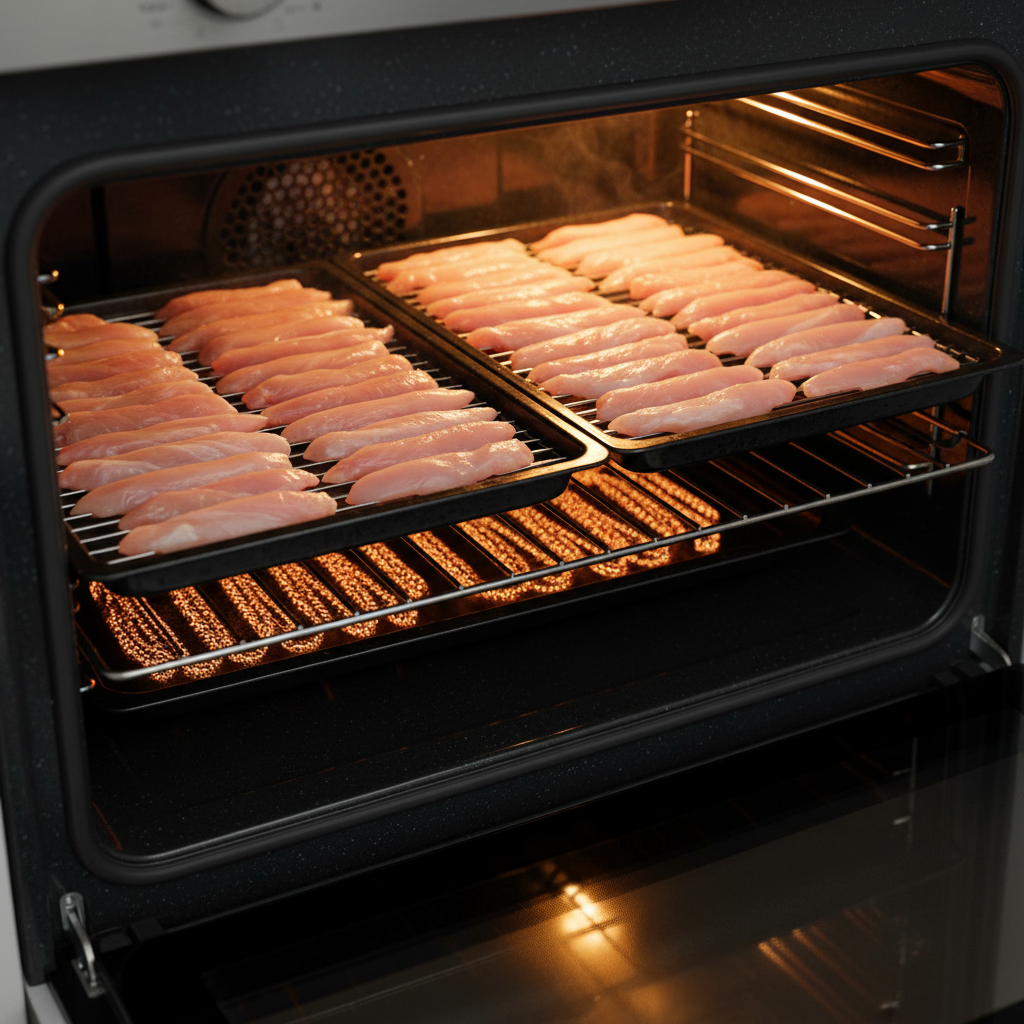
- Preheat Your Oven: Set your oven to its lowest possible temperature. For most ovens, this is between 170°F and 200°F (75°C to 95°C). If your oven runs hot, or doesn’t go that low, you may need to prop the door open slightly with a wooden spoon to allow heat and moisture to escape.
- Prepare Your Racks: Line a large baking sheet with parchment paper for easy cleanup. Place a metal wire cooling rack directly on top of the baking sheet. This is not an optional step. The wire rack is essential for allowing hot air to circulate around the entire surface of the chicken strips, ensuring they dry evenly. Without it, the bottoms will steam and will not dehydrate properly.
- Arrange the Chicken: Lay your prepared chicken strips on the wire rack in a single layer. Ensure that no pieces are overlapping or touching. Give each strip a little space for air to flow freely. Work in batches if necessary; do not overcrowd the racks.
- The Dehydration Phase: Place the baking sheets in the preheated oven. The drying time will vary significantly based on your oven’s temperature and the thickness of your slices, but a general timeframe is 2 to 4 hours. There’s no need to flip them if you’re using a wire rack.
- The Doneness Test: This is the most important part of the cooking process. You cannot judge doneness by color alone. The jerky should appear dry and feel leathery to the touch. It should not be soft or squishy. To test properly, remove one of the thickest pieces from the oven and let it cool for 5-10 minutes. Bend it; it should be firm and crack, but not snap like a potato chip. Then, break it in half completely. There should be no visible moisture inside, and the color should be consistent all the way through. If it’s still pink or soft in the center, it needs more time.
- Cool Down: Once the jerky is fully dehydrated, turn off the oven and let the jerky cool down completely on the wire racks. You can leave them on the counter or in the turned-off oven with the door ajar. Do not store them until they are 100% at room temperature, as any residual warmth will create condensation and lead to spoilage.
The Vault: Proper Storage for Maximum Freshness and Safety

You’ve successfully created pure, preservative-free jerky. Congratulations. Now you must protect your investment. Because you didn’t use any chemical shortcuts, proper storage is not just a suggestion—it’s a requirement for safety.
Short-Term Storage (The Ready Stash)
For jerky that you plan to use within the next 1 to 2 weeks, an airtight container is your best friend. Glass mason jars with a good seal are ideal. Store the container in the refrigerator. The cool, dark environment will drastically slow down the degradation of any microscopic fat particles that may remain, keeping the jerky fresh and safe.
Long-Term Storage (The Deep Freeze)
This is the batch-cooking hacker’s best strategy. For storing jerky for up to 6 months, the freezer is the ultimate vault.
- Vacuum Sealing: This is the gold standard. By removing all the air, you eliminate the risk of freezer burn and oxidation, preserving the jerky in a state of suspended animation. Portion them out into weekly amounts before sealing.
- Freezer Bags: If you don’t have a vacuum sealer, heavy-duty freezer bags are a good alternative. Place the cooled jerky inside, then press out as much air as humanly possible before sealing the bag. Double-bagging can provide extra protection.
Always label your bags or containers with the date they were made so you can follow the ‘first in, first out’ rule.
Red Flags: How to Spot Spoiled Jerky
Your eyes and nose are your best tools. Before giving any piece to your dog, give it a quick inspection. Discard the entire batch immediately if you notice:
- Visible Mold: Any spots of white, green, or black fuzz.
- Off-Smell: It should smell like dried chicken. Any rancid, sour, or ‘off’ odor is a major warning sign.
- Slimy or Soft Texture: If the jerky has become soft or developed a slimy film, it means moisture has gotten to it and bacterial growth has begun.
Hacker Tip: For unrefrigerated, short-term storage (e.g., taking on a weekend trip), you can place a food-grade silica gel packet inside your airtight container. These packets absorb any residual moisture. CRITICAL WARNING: Ensure the packet cannot be eaten by your dog. It’s a choking and toxicity hazard. Use this tip with extreme caution and only in containers your dog cannot access.
Conclusion
You’ve now graduated from a simple pet owner to a Canine Nutrition Hacker. You’ve bypassed the marketing gimmicks and chemical-laden products of the commercial treat industry. You’ve invested a little bit of time to create a product that is infinitely safer, healthier, and more economical than almost anything you can buy in a store.
Every time you hand your dog one of these pure, homemade jerky treats, you can feel confident knowing you provided them with the absolute best. You controlled the source, you controlled the process, and you controlled the safety. Stop paying for fillers and start investing in your dog’s health and happiness, one delicious, oven-baked treat at a time. Now go forth and hack your dog’s nutrition.