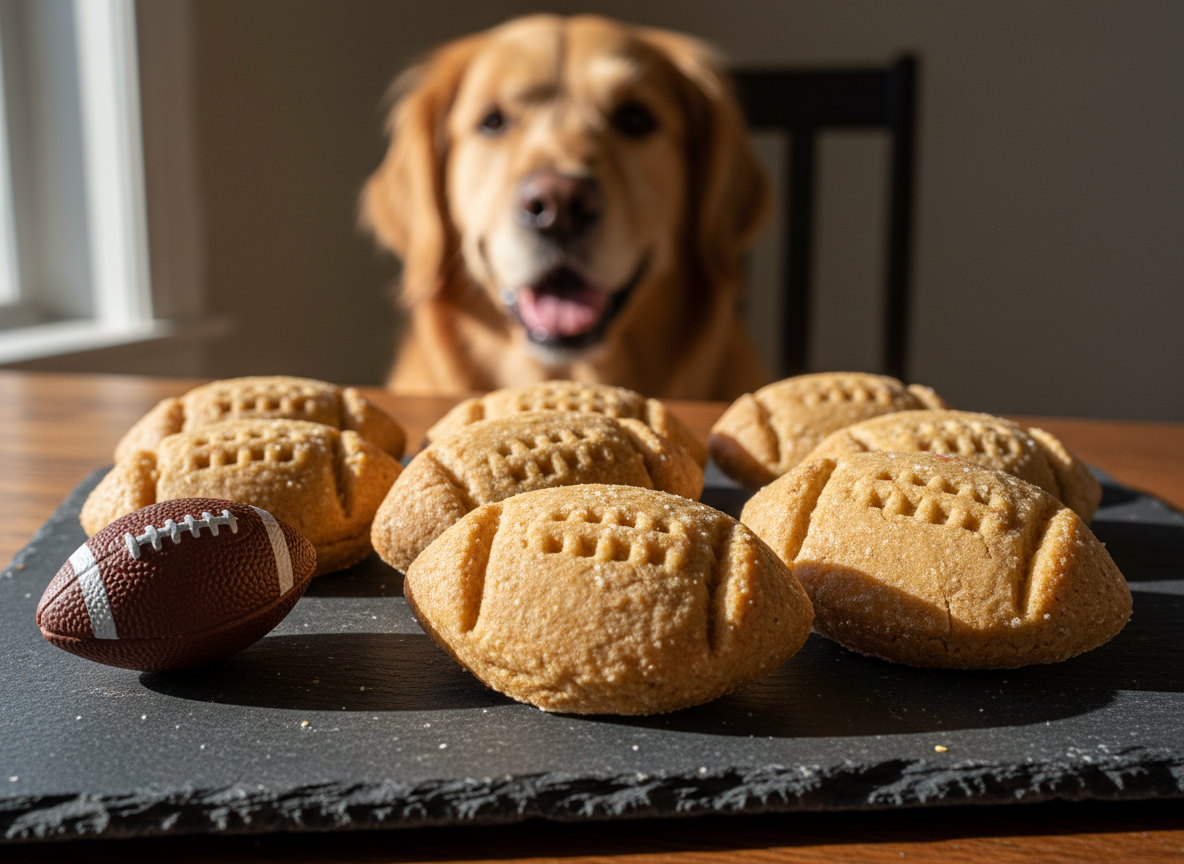
Touchdown Treats: Easy Football Shaped Dog Cookies for Game Day
Game day is a ritual. The jerseys come out, the snacks are prepped, and the entire family gathers to cheer. But while you’re enjoying wings and nachos, what’s your dog getting? A stale, store-bought biscuit packed with unpronounceable ingredients and cheap fillers? Not on my watch. I’m the Canine Nutrition Hacker, and my mission is to empower you to take control of your dog’s nutrition, even when it comes to treats. Forget the marketing gimmicks and the overpriced bags of junk. We’re heading into the kitchen to create a treat that’s not only festive and fun but also genuinely healthy and incredibly cost-effective. These Touchdown Treats are the ultimate upgrade for your four-legged fan, packed with wholesome ingredients you can actually recognize. Let’s get baking.
Critical Safety Briefing: Read This Before You Bake

Critical Safety Briefing: Read This Before You Bake
Before we preheat the oven, we need to have a serious talk. My entire philosophy is built on providing safe, optimal nutrition. That starts with understanding the rules of the game when making homemade food for your dog.
Let me be unequivocally clear: I am not a veterinarian or a certified animal nutritionist. The information provided here is for educational and entertainment purposes, based on extensive research and personal experience in analyzing canine diets. This recipe is for supplemental feeding only—these are treats, not a complete and balanced meal. They should not make up more than 10% of your dog’s daily caloric intake.
Every dog is an individual. A food that’s perfect for one may cause an allergic reaction in another. Always consult with your trusted veterinarian before introducing new foods into your dog’s diet, especially if your pet has known allergies, sensitivities, or underlying health conditions like pancreatitis or kidney disease. Furthermore, be vigilant about ingredients that are toxic to dogs. This recipe is safe, but your kitchen may contain hazards. Never include:
- Xylitol (a common artificial sweetener found in some peanut butters)
- Chocolate
- Onions, garlic, chives
- Grapes and raisins
- Macadamia nuts
- Alcohol or caffeine
Your dog’s safety is non-negotiable. Read labels, consult your vet, and treat responsibly.
The Forensic Ingredient Breakdown: Why This Recipe Wins
The Forensic Ingredient Breakdown: Why This Recipe Wins
The pet food industry thrives on confusion. They use fancy packaging and misleading terms like ‘gourmet’ and ‘premium’ to sell you treats made from cheap, low-quality ingredients. My approach is to analyze the ‘First 5’ ingredients, because that’s where the nutritional truth lies. Let’s break down the powerhouse ingredients in our Touchdown Treats and compare them to the typical garbage you find on store shelves.
Our All-Star Lineup:
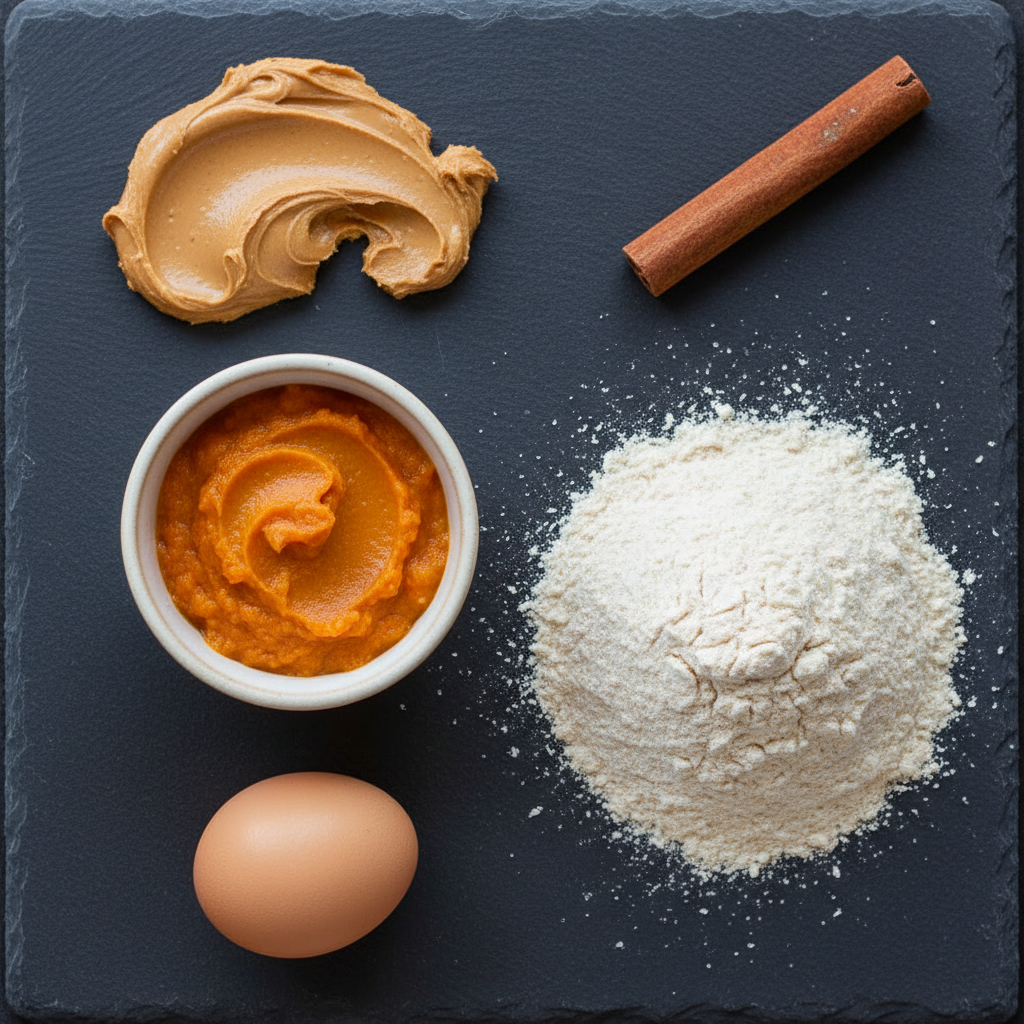
- 100% Pure Pumpkin Purée: This isn’t just a fall flavor. Pumpkin is a digestive superfood for dogs, rich in soluble fiber. It aids in both constipation and diarrhea, promoting gut health. We use pure pumpkin, not pumpkin pie filling, which is loaded with sugar and spices.
- Oat Flour: We’re skipping the cheap, inflammatory fillers like corn and wheat. Oat flour is a fantastic gluten-free alternative that provides fiber, vitamins, and minerals. You can even make your own by simply blending rolled oats in a high-speed blender.
- Natural, Xylitol-Free Peanut Butter: A flavor dogs go crazy for, peanut butter provides healthy fats and protein. The key is reading the label. WARNING: Some brands, especially ‘light’ or ‘sugar-free’ versions, contain Xylitol, which is extremely toxic to dogs. Choose a brand with one or two ingredients: peanuts and maybe salt.
- Eggs: The perfect natural binder, eggs are also a complete protein source, packed with amino acids and vitamins.
- Cinnamon: A pinch of this spice adds more than flavor. It has anti-inflammatory properties and can help regulate blood sugar.
Compare this clean, simple list to a popular store-bought treat that might list ‘Wheat Flour, Meat and Bone Meal, Sugar, Poultry Fat (preserved with BHA/BHT), Salt, Artificial Colors.’ You’re paying a premium for cheap flour, questionable protein sources, sugar, chemical preservatives, and dyes. The choice is obvious.
The Playbook: Your Step-by-Step Touchdown Treats Recipe
The Playbook: Your Step-by-Step Touchdown Treats Recipe
This recipe is designed to be simple, fast, and virtually foolproof. Get your apron on, and let’s make some canine-approved snacks.
Ingredients:
- 1 cup 100% Pure Pumpkin Purée
- 1/2 cup Natural, Creamy Peanut Butter (CHECK FOR NO XYLITOL)
- 2 large Eggs
- 2 1/2 cups Oat Flour (plus more for rolling)
- 1/2 teaspoon Cinnamon
Instructions:
- Pre-Game Prep: Preheat your oven to 350°F (175°C). Line a large baking sheet with parchment paper for easy cleanup.
- Mix the Wet Ingredients: In a large bowl, whisk together the pumpkin purée, peanut butter, and eggs until smooth and well-combined.
- Combine the Dry Ingredients: In a separate bowl, stir together the oat flour and cinnamon.
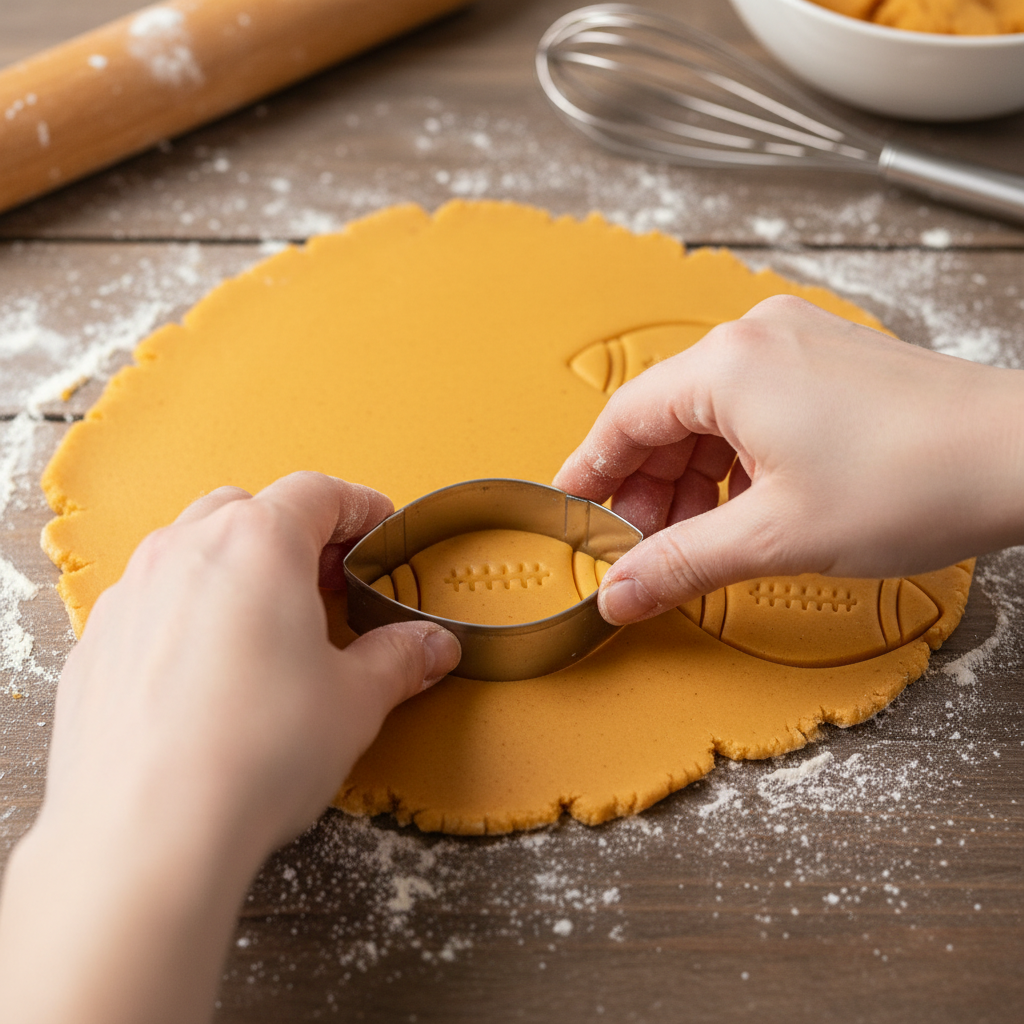
- Form the Dough: Gradually add the dry ingredient mixture to the wet ingredients, mixing until a stiff, sticky dough forms. If the dough is too sticky to handle, add a tablespoon of oat flour at a time until it’s workable.
- Roll and Cut: Lightly flour a clean surface with oat flour. Turn the dough out and roll it to about 1/4-inch thickness. Use a football-shaped cookie cutter to cut out the treats. Place them on the prepared baking sheet. You can re-roll the scraps to use all the dough.
- Bake to Perfection: Bake for 20-25 minutes, or until the edges are golden brown and the treats are firm. The baking time will vary slightly based on the size and thickness of your cookies.
- Cool Down: Let the treats cool on the baking sheet for a few minutes before transferring them to a wire rack to cool completely. This is crucial for getting a crunchy texture.
Hacker Tip: For an authentic football look, let the treats cool completely. Then, mix a small amount of plain Greek yogurt with a tiny bit of water to create a dog-safe ‘icing.’ Use a toothpick or a small piping bag to draw the laces on top of each cookie. Let it set before serving.
The Financial Huddle: DIY Savings vs. Store-Bought Scams
The Financial Huddle: DIY Savings vs. Store-Bought Scams
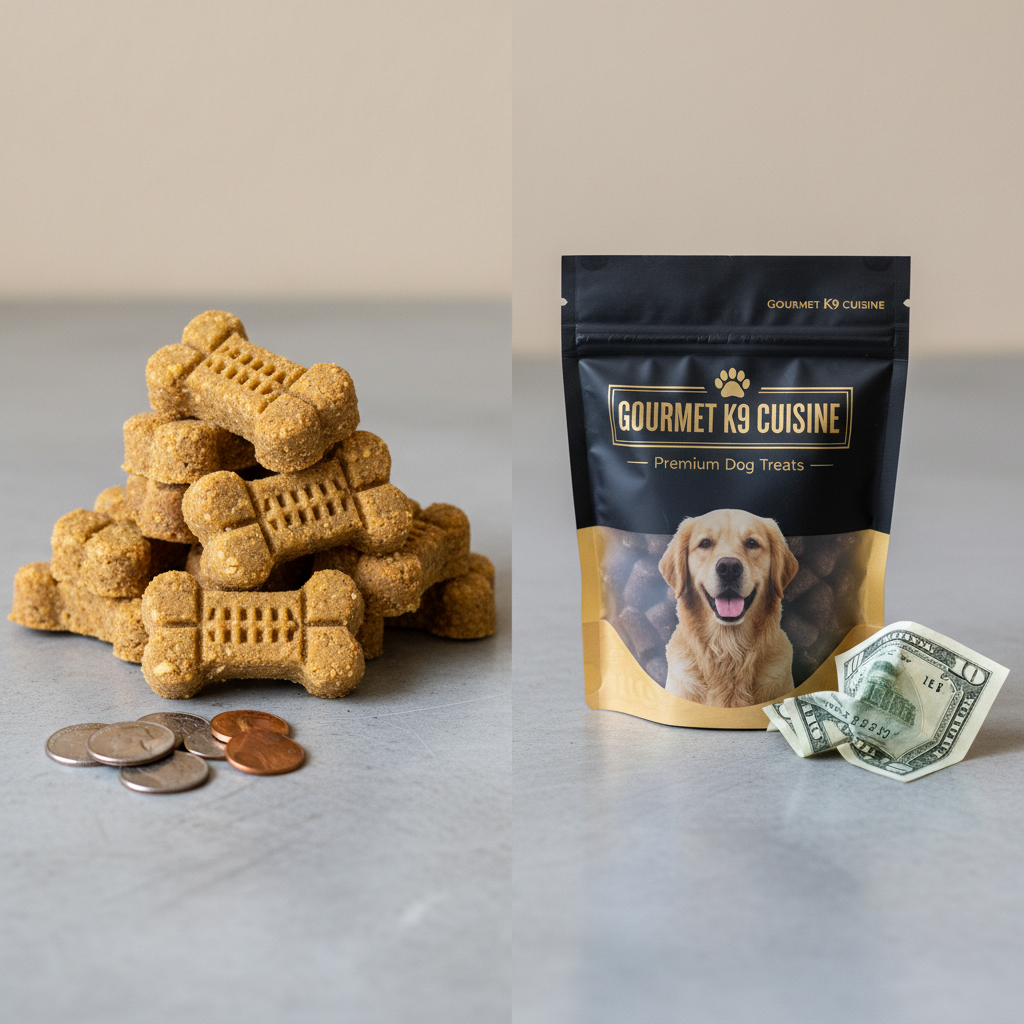
Let’s talk numbers. The ‘premium’ dog treat market is a billion-dollar industry built on convincing you that a fancy bag equals quality. By hacking the system and making your own, you’re not just upgrading the nutrition—you’re saving significant money. Here’s a direct comparison based on average US grocery prices.
| Metric | DIY Touchdown Treats (per batch) | Premium Grain-Free Store Brand (12 oz bag) | The Verdict |
|---|---|---|---|
| Key Ingredients | Pumpkin, Oat Flour, Natural Peanut Butter, Eggs | Pea Starch, Chicken, Potato Flour, Glycerin, Artificial Flavors | DIY Wins: Whole foods vs. processed starches and fillers. |
| Approximate Cost | $4.50 (makes ~40 treats) | $8.99 | DIY Wins: Nearly half the price for a larger quantity. |
| Cost Per Treat | ~$0.11 per treat | ~$0.30 per treat (assuming ~30 treats/bag) | DIY Wins: Almost 1/3 the cost per unit. |
| Ingredient Control | 100% control over quality and sourcing | Zero control, risk of recalls and hidden ingredients | DIY Wins: Unbeatable peace of mind. |
The math doesn’t lie. For roughly the price of a fancy coffee, you can produce a large batch of high-quality, nutritious treats that would easily cost you $15-$20 if sold in a boutique pet store. You’re not paying for marketing, shipping, or fancy packaging. You’re paying for pure, wholesome ingredients.
Extending the Season: Batching, Storing, and Freezing

Extending the Season: Batching, Storing, and Freezing
One of the biggest advantages of DIY is the ability to batch cook. This recipe can easily be doubled or tripled. Once you’ve baked and fully cooled your Touchdown Treats, proper storage is key to maintaining their freshness and crunch.
- Short-Term (Up to 1 Week): Store the treats in an airtight container at room temperature. A glass jar or a sealed container works perfectly. Do not seal them while they are still warm, as the trapped steam will make them soft.
- Medium-Term (Up to 2-3 Weeks): For a longer shelf life, store the airtight container in the refrigerator. This is a good option if your home is particularly warm or humid.
- Long-Term (Up to 3 Months): These treats freeze beautifully. Arrange them in a single layer on a baking sheet and ‘flash freeze’ them for an hour. Once they are frozen solid, transfer them to a freezer-safe bag or container. This prevents them from sticking together in a giant clump.
Hacker Tip: Use the frozen treats for enrichment. Stuff a frozen Touchdown Treat inside a KONG or other puzzle toy. It will take your dog longer to enjoy, providing mental stimulation and a cool, soothing snack on a warmer day. It’s a two-for-one benefit: a delicious treat and a boredom-buster.
Conclusion
You’ve done it. You’ve moved beyond being a passive consumer and become a proactive provider for your dog. By investing a small amount of time, you’ve created a snack that is leagues better than almost anything you can buy in a store. It’s healthier, free of chemical junk, and significantly cheaper. This is the core of the Canine Nutrition Hacker philosophy: using knowledge to cut through the marketing noise and deliver what your dog truly needs.
So next time you’re settling in for the big game, you can feel good knowing your most loyal fan is enjoying a treat made with care, intelligence, and love. That’s a win for everyone.