DIY Dog-Friendly Gingerbread House: The Ultimate Holiday Barkitecture
The holiday season is synonymous with tradition, and few are as cherished as constructing a gingerbread house. The scent of ginger and spices fills the air, and families gather to create edible masterpieces. But for pet owners, this tradition comes with a significant risk. Standard gingerbread is a minefield of ingredients toxic to our canine companions. From the potentially lethal sweetener xylitol to the poisonous spice nutmeg, a single bite can lead to a veterinary emergency.
This is where ‘Barkitecture’ comes in. We’re hijacking this holiday tradition and re-engineering it from the ground up to be a safe, healthy, and engaging activity for you and your dog. This isn’t just about making a cute treat; it’s about taking ultimate control over your dog’s nutrition, even during celebrations. Forget the overpriced, preservative-laden holiday treats from boutique stores. We’re building a better, safer, and more cost-effective alternative right in your own kitchen. Prepare to become the master architect of your dog’s holiday joy.
The Blueprint: A Forensic Analysis of Safe & Toxic Ingredients

The Blueprint: A Forensic Analysis of Safe & Toxic Ingredients
Before we lay the first foundation, we must operate with the precision of a forensic scientist. The difference between a festive treat and a trip to the emergency vet lies entirely in the ingredient list. Your dog’s safety is non-negotiable.
CRITICAL SAFETY DISCLAIMER
Let’s be unequivocally clear: I am a canine nutrition analyst, not a veterinarian. This recipe is engineered as a special occasion treat and must not be used as a meal replacement. It is imperative to consult your veterinarian before introducing any new foods into your dog’s diet, particularly for pets with known allergies, sensitivities, or pre-existing health conditions. This recipe is for supplemental feeding only.
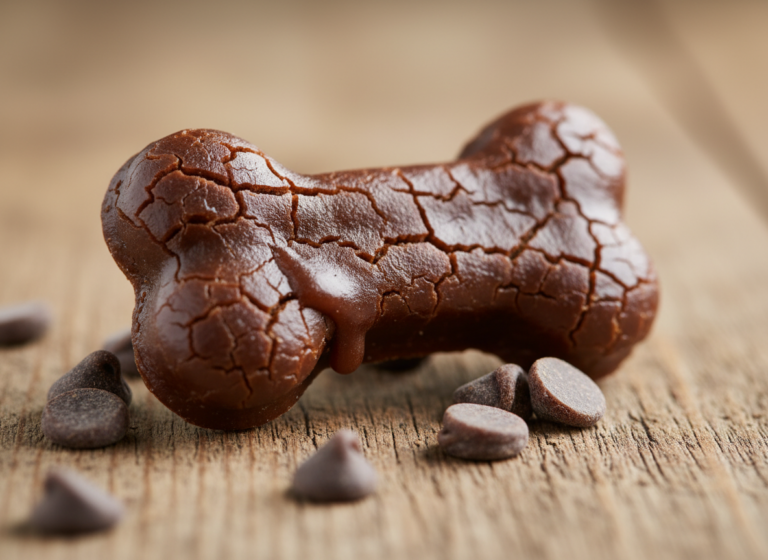
Enemy Ingredients: The ‘Do Not Use’ List
These common gingerbread ingredients are toxic to dogs and must be completely avoided:
- Nutmeg: This spice contains myristicin, a compound that can cause hallucinations, disorientation, increased heart rate, and seizures in dogs. It is highly toxic.
- Xylitol: An artificial sweetener found in many ‘sugar-free’ products. It is extremely poisonous to dogs, causing a rapid release of insulin that leads to hypoglycemia, seizures, liver failure, and death. Read every label of every ingredient to ensure it’s not hiding in your peanut butter or applesauce.
- Sugar & Molasses: While not acutely toxic, high sugar content is detrimental to your dog’s health. It can cause severe gastrointestinal upset (vomiting, diarrhea) and contributes to obesity, dental problems, and can trigger pancreatitis, a painful and potentially fatal inflammation of the pancreas.
- Cloves & Allspice: Like nutmeg, these spices contain eugenols which can cause liver toxicity in dogs, especially in concentrated forms like essential oils.
Hero Ingredients: Your Approved Building Materials
We will replace the toxic components with a roster of safe, beneficial ingredients:
- Ginger: A true hero ingredient. In appropriate, small quantities, ginger is known for its anti-inflammatory properties and its ability to soothe an upset stomach. We use it for flavor and function.
- Ceylon Cinnamon: Not all cinnamon is created equal. Avoid Cassia cinnamon, which is common and contains higher levels of coumarin, a compound that can be harmful in large doses. Ceylon cinnamon is the safer choice for canines and provides antioxidant benefits.
- Whole Wheat or Oat Flour: A solid, fiber-rich base. For dogs with grain sensitivities, you can substitute with coconut or chickpea flour, though you may need to adjust liquid levels.
- Unsweetened Applesauce or Pumpkin Purée: These act as natural binders and provide a hint of sweetness without the dangers of sugar. They also add valuable fiber and vitamins. Ensure they are 100% pure fruit/vegetable with no added sugar or xylitol.
- Coconut Oil: A healthy fat that helps bind the dough and supports skin and coat health.
Cost-Benefit Analysis: DIY ‘Barkitecture’ vs. Boutique Treats
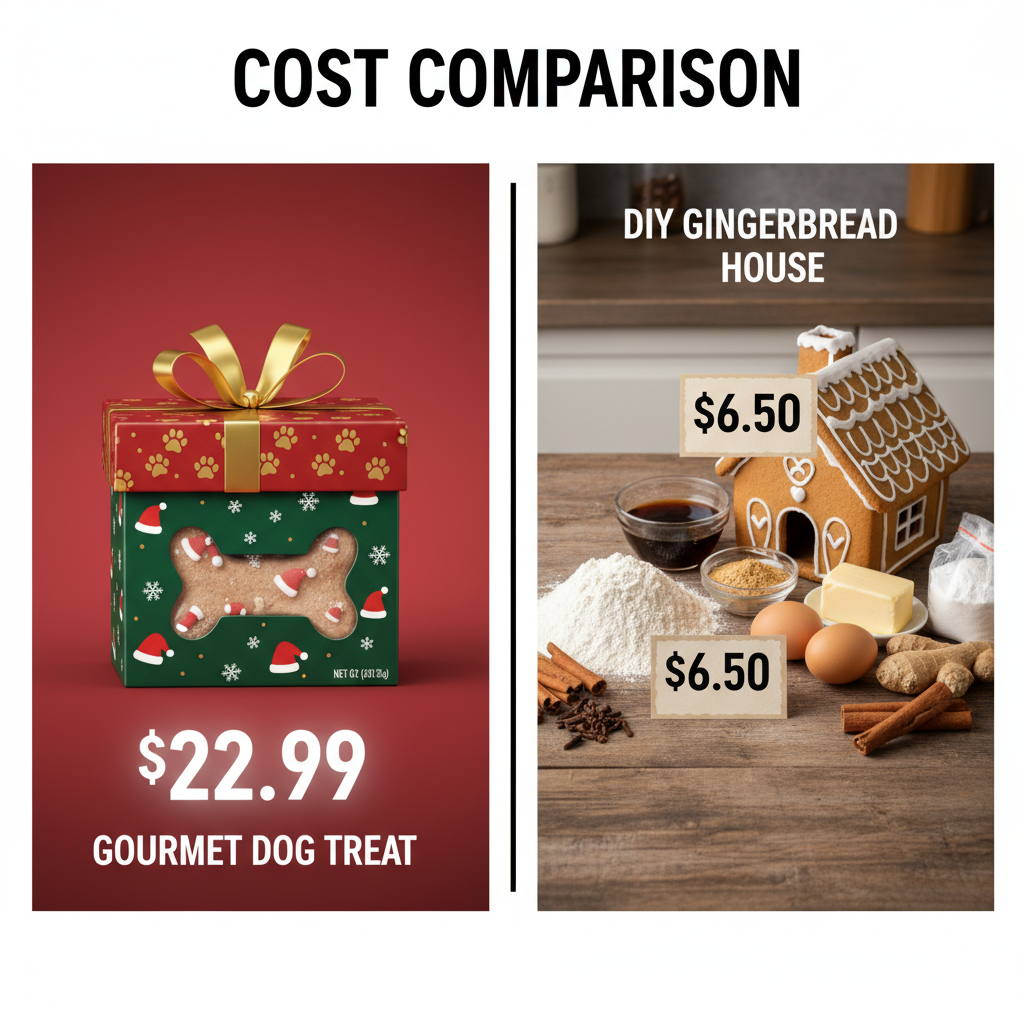
Cost-Benefit Analysis: DIY ‘Barkitecture’ vs. Boutique Treats
The pet food industry thrives on emotional purchases, especially around the holidays. A fancy, decorated ‘gourmet’ dog treat can easily set you back $20 or more. But what are you actually paying for? Often, it’s clever marketing, cheap fillers, and sugar-based icings disguised with pet-friendly labels. By taking the DIY route, you not only slash costs but also gain absolute quality control.
Let’s break down the real numbers. The following is an approximate cost comparison for a single, elaborate holiday treat.
| Metric | Store-Bought ‘Gourmet’ Treat | DIY ‘Barkitecture’ House |
|---|---|---|
| Estimated Cost | $18.00 – $25.00 | $5.00 – $8.00 (for all ingredients) |
| Ingredient Quality | Variable; often contains sugar (honey, yogurt drops), cheap flours, and artificial colorants. | 100% controlled by you. Human-grade, organic options. |
| Transparency | Minimal. You only know what’s on the label. | Absolute. You know every single item in the recipe. |
| Enrichment Value | Low. The dog just eats it. | High. The process of building and then safely disassembling the house provides mental stimulation for your dog. |
| The Verdict | High Cost, Low Control | Low Cost, Maximum Control & Benefit |
Hacker Tip: Many of these ‘hero’ ingredients, like pumpkin purée and oat flour, are staples in a health-conscious canine kitchen. Buying them in bulk for other uses, like meal toppers, drives the per-project cost of this gingerbread house down even further. You’re not just buying ingredients for one treat; you’re investing in your dog’s overall nutritional arsenal.
The Master Recipe: Constructing Your Canine Castle
The Master Recipe: Constructing Your Canine Castle
This is the core blueprint. Follow these instructions precisely for structurally sound and dog-approved walls. This recipe is designed to be firm for construction, not soft and chewy.
Ingredients for the ‘Ginger-Dough’ Walls
- 2 ½ cups whole wheat flour (or oat flour for a grain-free option)
- 1 tablespoon ground ginger
- 1 teaspoon Ceylon cinnamon
- ½ cup unsweetened applesauce or pumpkin purée
- ¼ cup coconut oil, melted
- ¼ cup cool water
- 1 large egg
Construction Instructions
- Prepare the Dry Mix: In a large mixing bowl, whisk together the flour, ground ginger, and cinnamon until thoroughly combined. This ensures the spices are evenly distributed.
- Combine Wet Ingredients: In a separate bowl, mix the unsweetened applesauce (or pumpkin), melted coconut oil, water, and the egg. Whisk until you have a smooth, uniform liquid.
- Form the Dough: Pour the wet mixture into the bowl of dry ingredients. Start mixing with a spatula and then switch to your hands. Knead the dough for 2-3 minutes until it forms a firm, non-sticky ball. If it’s too dry, add water one teaspoon at a time. If too sticky, add a sprinkle of flour.
- Chill for Stability: This step is critical for construction. Wrap the dough ball tightly in plastic wrap and refrigerate for at least 3 hours, or overnight. Chilling the dough prevents it from spreading during baking, ensuring your house pieces fit together perfectly.
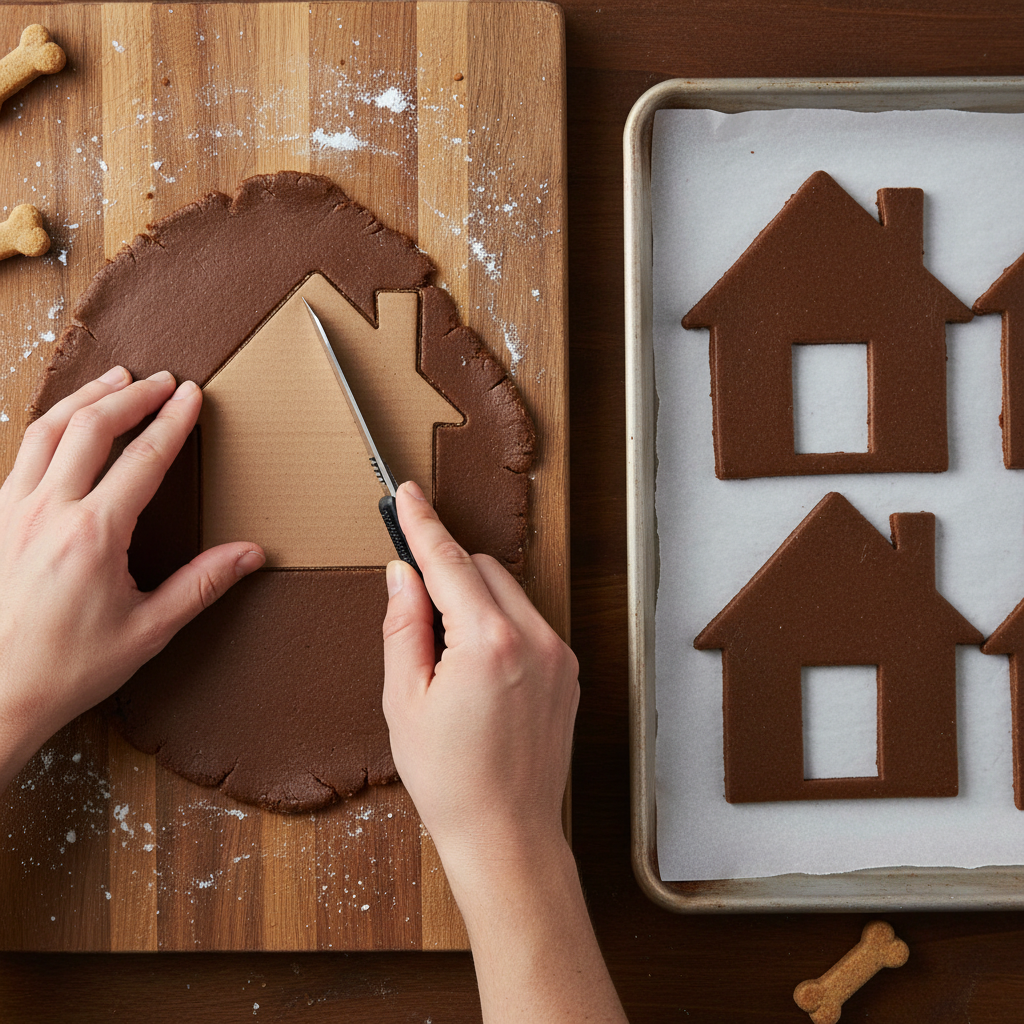
- Cut Your Templates: While the dough chills, create your house templates from cardboard. You’ll need two side walls, two front/back gables, and two roof panels. A simple 4×3 inch rectangle for walls and a 4×5 inch rectangle for the roof is a great starting point.
- Roll and Cut: Preheat your oven to 350°F (175°C). Lightly flour a work surface and your rolling pin. Roll the chilled dough out to about ¼-inch thickness. Place your templates on the dough and carefully cut out the shapes with a knife or pizza cutter. Place them on a parchment-lined baking sheet.
- Bake to Harden: Bake for 20-25 minutes. We want the pieces to be hard and sturdy, like a structural biscuit. They should be dark brown and firm to the touch.
- Cool Completely: Let the pieces cool on the baking sheet for 10 minutes before transferring them to a wire rack to cool completely. Do not attempt assembly with even slightly warm pieces; they will crumble. This can take at least an hour.
The ‘Icing’ on the Cake: Dog-Safe Mortar and Decorations

The ‘Icing’ on the Cake: Dog-Safe Mortar and Decorations
Human icing is a toxic sugar bomb. Our ‘mortar’ not only has to be safe, but it also needs to have superior binding power to hold your architectural marvel together. Once assembled, we’ll adorn it with decorations that are both beautiful and beneficial.
Dog-Safe Cement Icing Recipe
This recipe creates a thick, pipeable ‘glue’ that hardens when chilled.
- ½ cup plain Greek yogurt or cream cheese (low-fat)
- 2-3 tablespoons tapioca starch or cornstarch
Instructions: In a bowl, mix the yogurt or cream cheese with the starch. Start with 2 tablespoons of starch and add more as needed until you have a very thick, stiff paste. It should be difficult to stir. Transfer this mixture to a piping bag or a zip-top bag with a corner snipped off.
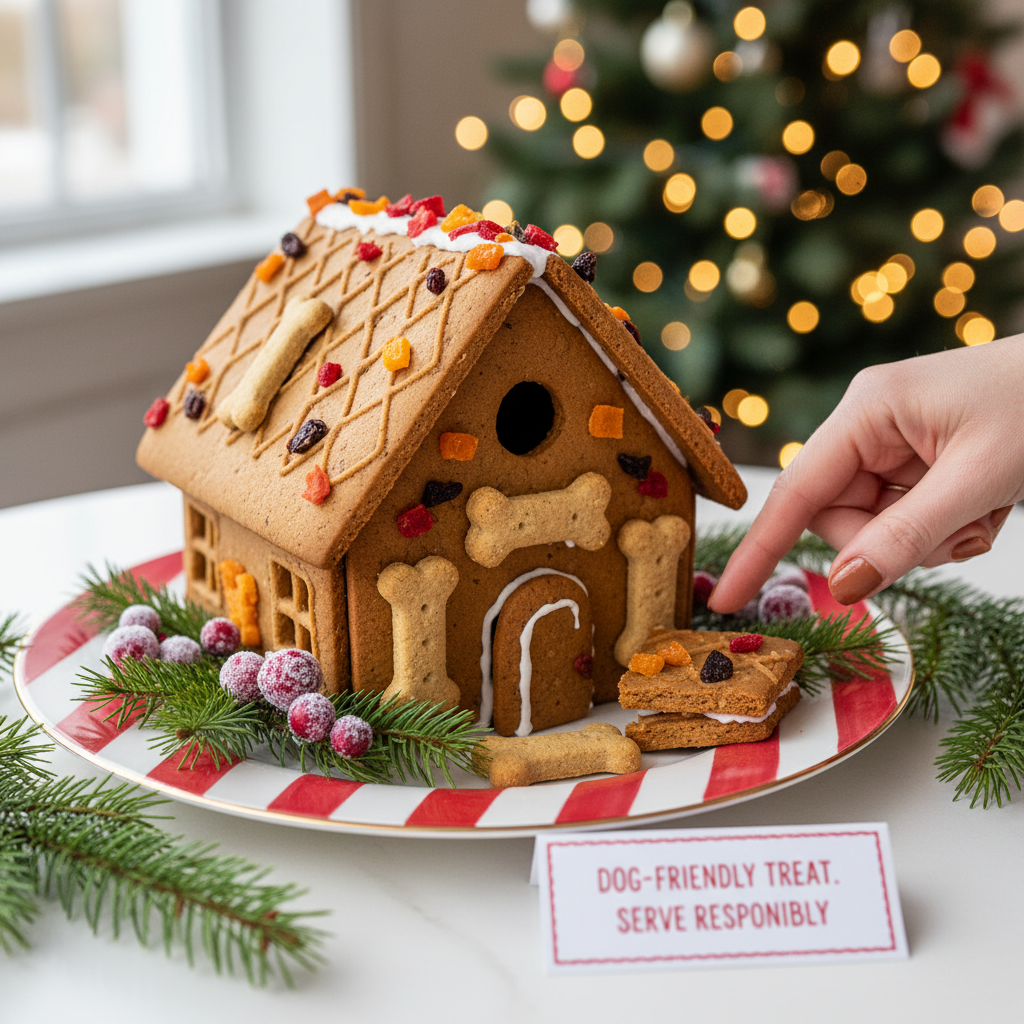
Assembly and Decoration
- Lay the Foundation: Pipe a thick line of the cement icing onto a plate or cutting board to serve as your foundation.
- Erect the Walls: Take your front gable piece and pipe icing along its side and bottom edges. Press it into the foundation. Take a side wall, pipe icing on its edges, and press it against the front piece and into the foundation. Repeat for all four walls, piping icing into the interior corners for extra stability.
- Refrigerate to Set: Place the four-walled structure in the refrigerator for at least 30 minutes to allow the icing to harden. Do not skip this step.
- Attach the Roof: Remove the base from the fridge. Pipe a generous amount of icing along the top edges of the gables. Carefully place the two roof panels onto the house, holding them for a minute until they feel secure. Pipe a thick line of icing along the peak of the roof where the two panels meet.
- Final Chill: Refrigerate the completed house for another hour to fully set before decorating.
Approved Decorative Materials
Adorn your masterpiece with flair, using only these approved items:
- Roof Shingles: Small, plain dog biscuits (like mini training treats) or dehydrated sweet potato slices.
- Windows and Doors: A square of a different colored dog biscuit or a smear of peanut butter (xylitol-free ONLY).
- Holiday Lights: Fresh cranberries or blueberries pressed into the icing.
- Snowy Dusting: A light sprinkle of unsweetened shredded coconut or a dusting of oat flour.
- Walkway: A path made from plain, unsalted pumpkin seeds or sunflower seeds.
- Forbidden Garnish: NEVER use chocolate or cocoa powder. If you want a brown color, use a small amount of carob powder mixed with water to create a ‘paint’.
The Final Inspection: Storage, Serving, and Portion Control
The Final Inspection: Storage, Serving, and Portion Control
Your ‘Barkitecture’ project is complete. Now comes the most important part for your dog’s health: responsible storage and serving. This is not a free-for-all chew toy. It is a high-value, portion-controlled reward.
Storage Protocol
Because our ‘cement’ icing is made from a dairy base (yogurt or cream cheese), the finished house must be stored in the refrigerator. It will keep for up to 5 days. If you wish to keep it longer as a decoration, you can, but it should not be fed to your dog after this period. The baked ‘ginger-dough’ pieces, if left undecorated, can be stored in an airtight container at room temperature for up to two weeks.
Insider Secret: The raw ‘ginger-dough’ can be made, wrapped tightly, and frozen for up to a month. Thaw it in the fridge overnight before you’re ready to roll and bake. This hacker tip breaks the project into manageable steps during the busy holiday season, separating dough prep from the fun of construction.
Serving Guidelines: The Controlled Demolition
Do not let your dog eat the house whole. This could pose a choking hazard and lead to a massive overconsumption of calories. The proper way to serve it is through a ‘controlled demolition’.
- Break off a small piece of the structure.
- Remove any large decorations like cranberries that could be a choking hazard for small dogs.
- Serve the piece as a special treat.
Portion control is paramount. This is a rich, dense treat. Adhere to these guidelines:
- Small Dogs (under 20 lbs): A piece no larger than a postage stamp (1-inch square).
- Medium Dogs (20-50 lbs): A 1.5 to 2-inch square piece.
- Large Dogs (over 50 lbs): A 2 to 3-inch square piece.
This treat should be given once per day at most, and you should consider reducing the size of their regular meal slightly on the day they receive it to account for the extra calories.
Conclusion
You have now successfully engineered a holiday centerpiece that is not only visually charming but also perfectly safe and enjoyable for your canine companion. By investing the time in this ‘Barkitecture’ project, you’ve done more than just bake; you’ve actively protected your dog from harmful ingredients, saved money, and created a unique bonding experience. This is the core philosophy of a Canine Nutrition Hacker: taking full control of what goes into your dog’s body and elevating their well-being through smart, informed choices. Now, enjoy the controlled demolition and the well-deserved tail wags. You’ve earned them.