Megaesophagus Feeding Guide: How to Use a Bailey Chair Correctly
A megaesophagus diagnosis can feel like a gut punch. Your veterinarian hands you a complex condition, and suddenly, the simple act of feeding your dog becomes a high-stakes medical procedure. The internet is a minefield of conflicting advice, and fear of the dreaded aspiration pneumonia is constant. Let’s cut through the noise. I’m the Canine Nutrition Hacker, and my job is to give you the operational playbook—the insider strategies that work. This isn’t about fluff; it’s about forensic-level analysis of what your dog needs to not just survive, but thrive.
Megaesophagus means your dog’s esophagus—the tube from the throat to the stomach—is enlarged and has lost its muscular ability to move food. It’s become a passive, floppy bag. Food and water don’t get pushed down; they just sit there until gravity or regurgitation moves them. Our mission is to become masters of gravity and consistency. The Bailey Chair is our most critical tool in this fight, but using it correctly is non-negotiable.
MEDICAL DISCLAIMER: I am not a veterinarian. This guide is for informational purposes and is based on extensive research and established best practices within the megaesophagus community. Your dog’s condition is unique. You MUST work directly with a qualified veterinarian to develop a management plan tailored to your dog’s specific needs, including diagnosis, medication, and dietary formulation. This information is intended to supplement, not replace, professional veterinary advice.
Deconstructing Megaesophagus: The ‘Why’ Behind the ‘How’
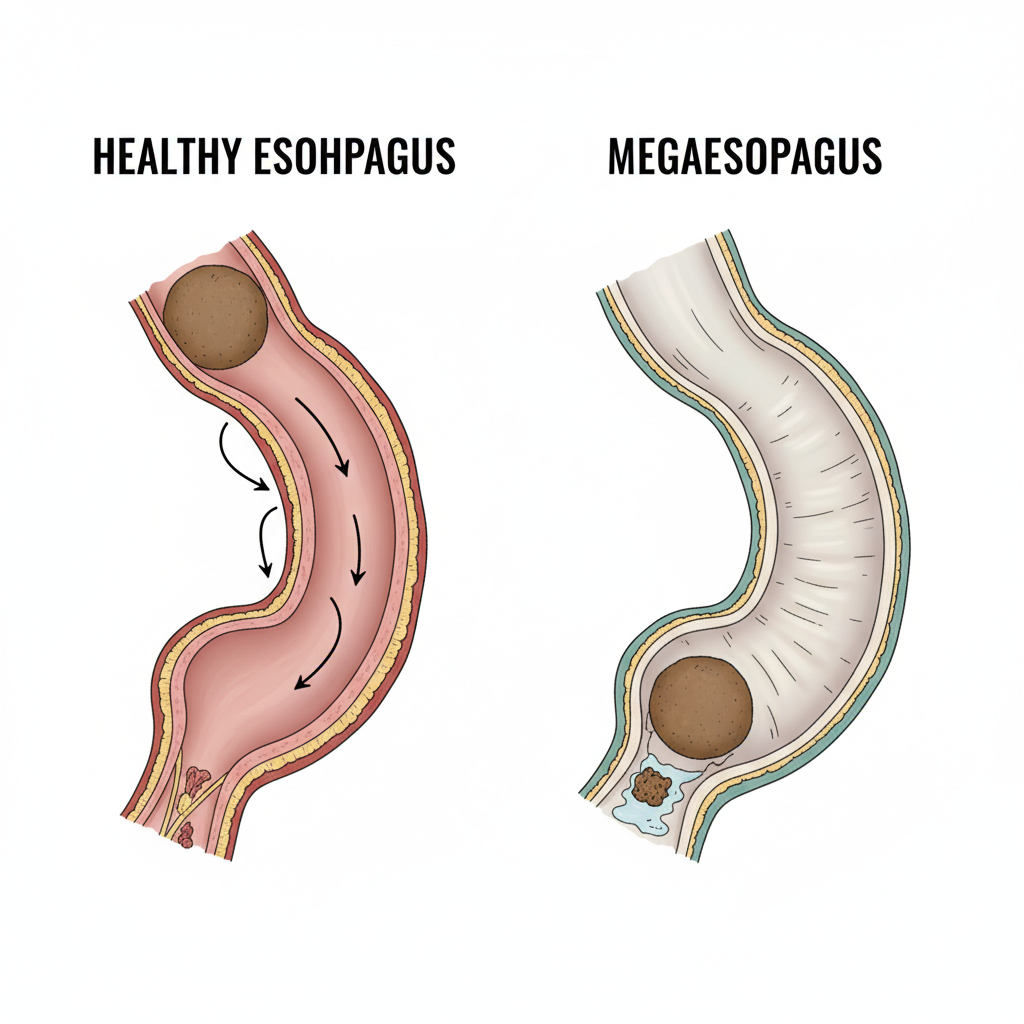
To beat the enemy, you have to understand it. Forget complex medical jargon. Picture your dog’s esophagus as a deflated balloon. In a healthy dog, coordinated muscle contractions (peristalsis) push food down into the stomach like a well-oiled machine. With megaesophagus, that machine is broken. The tube is enlarged and lacks motility. Food simply drops in and pools, stretching the tissue further.
Why is this so dangerous? Two reasons:
- Malnutrition: If food can’t reach the stomach, your dog can’t absorb its nutrients. Weight loss and weakness are common early signs.
- Aspiration Pneumonia: This is the primary threat and the one we must relentlessly defend against. When pooled food and liquid are regurgitated (a passive process, unlike active vomiting), they can easily be inhaled into the lungs. Food does not belong in the lungs. This inhalation, or ‘aspiration’, leads to a severe, often life-threatening infection: aspiration pneumonia.
Our entire management strategy is built around mitigating this single, critical risk. We cannot fix the esophagus, but we can control the variables that lead to aspiration. Our tools are not medications or surgeries, but physics and food science. Gravity is our new best friend. The Bailey Chair facilitates the use of gravity. Food consistency is how we ensure the payload—the nutrition—makes it to the stomach without incident. Master these two elements, and you control the condition.
The Ultimate Weapon: Mastering the Bailey Chair
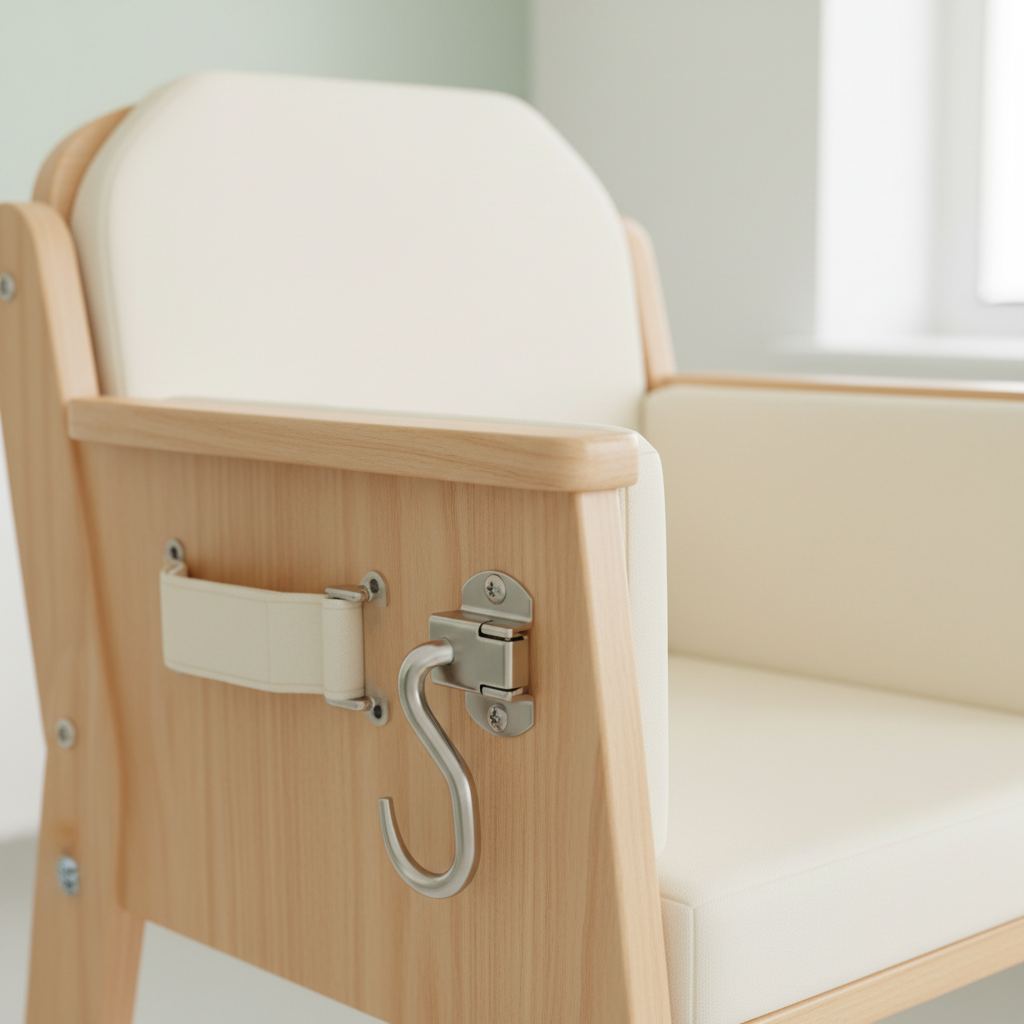
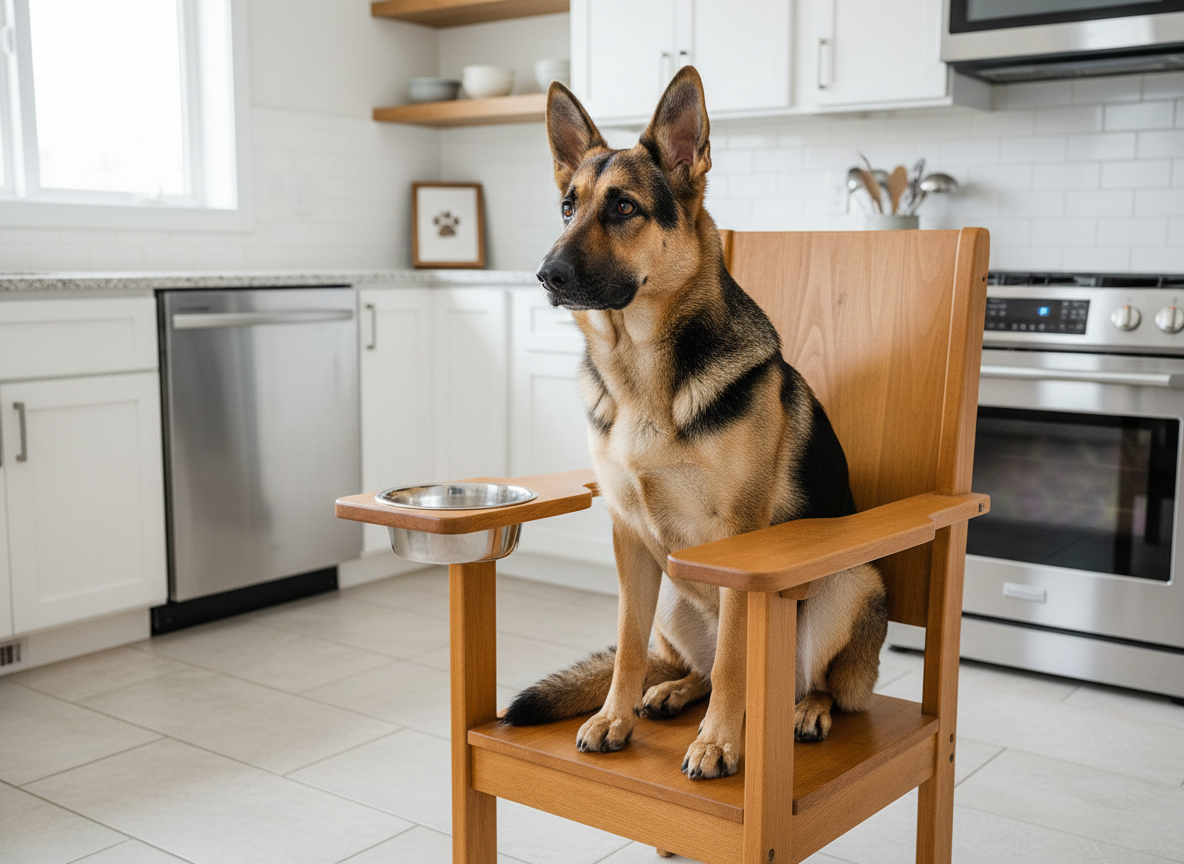
The Bailey Chair is not an accessory; it is a piece of essential medical equipment. Its sole purpose is to hold your dog in a perfectly vertical, ‘begging’ position during and after feeding. This posture allows gravity to do the work the esophagus no longer can, pulling the food down into the stomach. An improperly used or poorly fitted chair is ineffective and potentially dangerous.
Building vs. Buying: A Cost-Benefit Analysis
You have three primary options for acquiring a chair: buy a pre-made one, order a custom build, or DIY. There’s no single right answer—it’s about budget and skill.
- Pre-Made/Stock: Faster to acquire but may not provide a perfect fit for uniquely shaped dogs. Often the most expensive option.
- Custom-Built: The gold standard for fit and comfort. Companies specializing in these will build to your dog’s exact measurements. Excellent quality, but comes with a higher price tag and wait time.
- DIY (Do-It-Yourself): The most cost-effective option if you are handy. Plans are readily available online (the ‘Canine Megaesophagus Support Group’ on Facebook is an invaluable resource). A perfect fit is achievable, but it requires time, tools, and skill. A poorly constructed chair is a safety risk.
The Perfect Fit: Critical Measurements and Adjustments
A proper fit is paramount. A chair that is too tight is uncomfortable and can cause sores. A chair that is too loose will not hold your dog in the necessary vertical position, defeating its purpose. The dog should be snug and secure, like a baby in a car seat—not rattling around, but not constricted.
- Width: The interior should be just wide enough for your dog’s chest, with minimal side-to-side wiggle room.
- Depth: The dog’s back should be fully supported. The ‘seat’ or footrest should be positioned so their paws rest comfortably and their rear is supported.
- Height: The chair must be tall enough to support the dog’s entire torso and head in a vertical line. The food bowl tray should be adjustable to sit just under their chin.
Step-by-Step Usage Protocol: The Non-Negotiable Routine
Consistency is key. Every feeding must follow this protocol without deviation.
- Prepare the Meal: Get the food to the exact right consistency (more on this in the next section) before you even bring your dog to the chair.
- Guide the Dog In: Use positive reinforcement. Lure your dog into the chair backwards. The goal is for them to associate the chair with something good (food). Never force them.
- Secure and Position: Close the door or latch. Ensure they are sitting fully upright. Their spine should be straight and vertical. Use a neck pillow or rolled towel if needed to keep their head from slumping.
- Feed Slowly: Place the food bowl on the tray. Encourage your dog to eat slowly. Some owners feed meatballs by hand to pace the meal.
- The Critical Wait Time: This is the most commonly skipped, and most important, step. After the last bite, your dog MUST remain in the chair in a vertical position for 20-30 minutes. Set a timer. This allows gravity the time it needs to ensure all food has reached the stomach.
- Post-Feeding Burp: Some owners find it helpful to ‘burp’ their dog like a baby, gently patting their sides to release any trapped air before letting them out of the chair.
- Gentle Release & Monitoring: Let your dog out calmly. Keep activity low for at least an hour after feeding—no rough play or running. Listen for any signs of regurgitation (gurgling sounds, coughing).
Food Forensics: Hacking the Perfect Megaesophagus Meal

For a megaesophagus dog, food consistency is more important than brand names or ingredient panels. The wrong texture can get stuck or be easily aspirated, regardless of how nutritious it is. The right texture slides down into the stomach with the help of gravity alone. You will become a master of texture.
Enemy Consistencies: The Dangers of Dry Kibble and Free-Access Water
These two things are the primary enemies. Loose, dry kibble is a major choking and blockage hazard. It can get stuck in the esophagus and is difficult to clear. Similarly, a bowl of water on the floor is one of the biggest risks for aspiration. When a dog laps up water, it’s thin and easily sloshes back up the esophagus and into the lungs. Free-access water bowls must be removed. All hydration must be managed.
Hero Consistencies: The ‘Gruel’ vs. ‘Meatball’ Debate
Through trial and error, the megaesophagus community has perfected two primary feeding textures. You may need to experiment to see which works best for your dog.
- The Slurry/Gruel: This involves taking kibble or canned food and blending it with water (or a supplement like goat’s milk) into a thick, smooth consistency. Think pancake batter or a thick milkshake. It should be thin enough to slide down easily but thick enough that it doesn’t slosh around like water. A high-powered blender like a Vitamix is your best tool for this.
- The Meatball: This method uses canned, fresh, or raw food that has a tacky, dense consistency. You roll the food into small, bite-sized meatballs. The theory is that the dense, heavy ball drops more cleanly and directly into the stomach. The meatballs must be moist enough to not get stuck.
Hacker Tip: Getting the slurry consistency perfect can be a challenge. Many owners swear by adding a flavorless thickener like Thick-It (a product for humans with dysphagia) or plain, unflavored gelatin to their slurry. This helps bind the food and water, preventing separation in the esophagus and creating a smoother slide.
Hydration Hacking: The End of the Water Bowl
Since a water bowl is off-limits, all hydration must be provided within the meal or in a controlled way. If you’re feeding a slurry, you’re already adding significant water to the food. For meatball-fed dogs or for extra hydration, the best hack is making ‘Knox Blox’.
- Mix 4 packets of unflavored Knox gelatin into 1 cup of cold liquid (water or low-sodium bone broth).
- Add 3 cups of hot liquid and stir until fully dissolved.
- Pour into a shallow pan and refrigerate until firm.
- Cut into small cubes. These gelatinous cubes hold water in a semi-solid form that can be fed as treats or with meals, allowing for safe hydration.
Advanced Protocols & Troubleshooting Common Issues

Even with a perfect setup, challenges will arise. Being able to troubleshoot effectively is part of the management process. Here’s how to tackle the most common problems.
Problem: My Dog Fights or Hates the Chair
This is a training issue. The chair must be a place of positive, not negative, association. Never punish the dog in or near the chair.
- Start Slow: Introduce the chair without feeding. Lure them in, give them a high-value treat they can safely eat (like a lick of peanut butter from a spoon), and let them out immediately. Repeat for days, gradually increasing the duration.
- Make it Comfortable: Ensure all surfaces are padded and the fit is perfect. A chair that pinches or rubs will create a negative association.
- Feed High-Value Food: Use their absolute favorite food for chair feedings to build a strong positive link.
Problem: Regurgitation Persists Despite the Chair
Don’t panic. This calls for systematic troubleshooting.
- Increase Wait Time: The 20-30 minute rule is a baseline. Some dogs, particularly those with severe esophageal dilation, may need 45 minutes or even longer. Increase the time in 10-minute increments and observe.
- Adjust Food Consistency: If you’re feeding slurry, try making it thicker. If you’re feeding meatballs, try making them smaller and denser. The ‘perfect’ consistency can change over time.
- Check Chair Position: Is your dog truly vertical? If they are slumping or leaning, the gravity-assist is less effective. Use rolled towels or custom inserts to ensure they maintain a perfect posture.
- Meal Size and Frequency: Try feeding three or four smaller meals throughout the day instead of two large ones. This puts less volume in the esophagus at any one time.
Insider Secret: The Neck Pillow Hack. Many veteran owners use a simple travel neck pillow (like you’d use on an airplane) on their dog while in the chair. It prevents the head from slumping forward, which can create a ‘kink’ at the top of the esophagus and impede the food’s path. It keeps the entire channel from throat to stomach as straight as possible.
Problem: Suspected Aspiration Pneumonia
You must know the signs and be prepared to act immediately. This is a medical emergency.
- Lethargy and Depression: A sudden lack of energy or interest.
- Coughing or Wheezing: Especially a wet, ‘gurgly’ cough.
- Fever: Learn how to take your dog’s temperature.
- Difficulty Breathing or Rapid Breathing: A clear sign of respiratory distress.
- Nasal Discharge: May be clear or cloudy.
If you observe any of these signs, contact your veterinarian or an emergency clinic immediately. Do not wait. Early and aggressive antibiotic treatment is critical for a positive outcome.
Conclusion
Managing a dog with megaesophagus is a journey of dedication. It transforms you from a simple pet owner into a meticulous canine care specialist. Your life will revolve around timers, blenders, and the upright posture of your beloved companion. But it is not a hopeless fight. By understanding the mechanics of the disease and mastering the tools at your disposal, you can provide your dog with a long, happy, and comfortable life.
Remember the core principles: strict vertical feeding, absolute control over food and water consistency, and a non-negotiable post-meal wait time. You are the expert on your dog. You are their advocate and their lifeline. Stay vigilant, trust your instincts, and never hesitate to consult your veterinarian. You have the power to hack this condition and give your dog the quality of life they deserve.