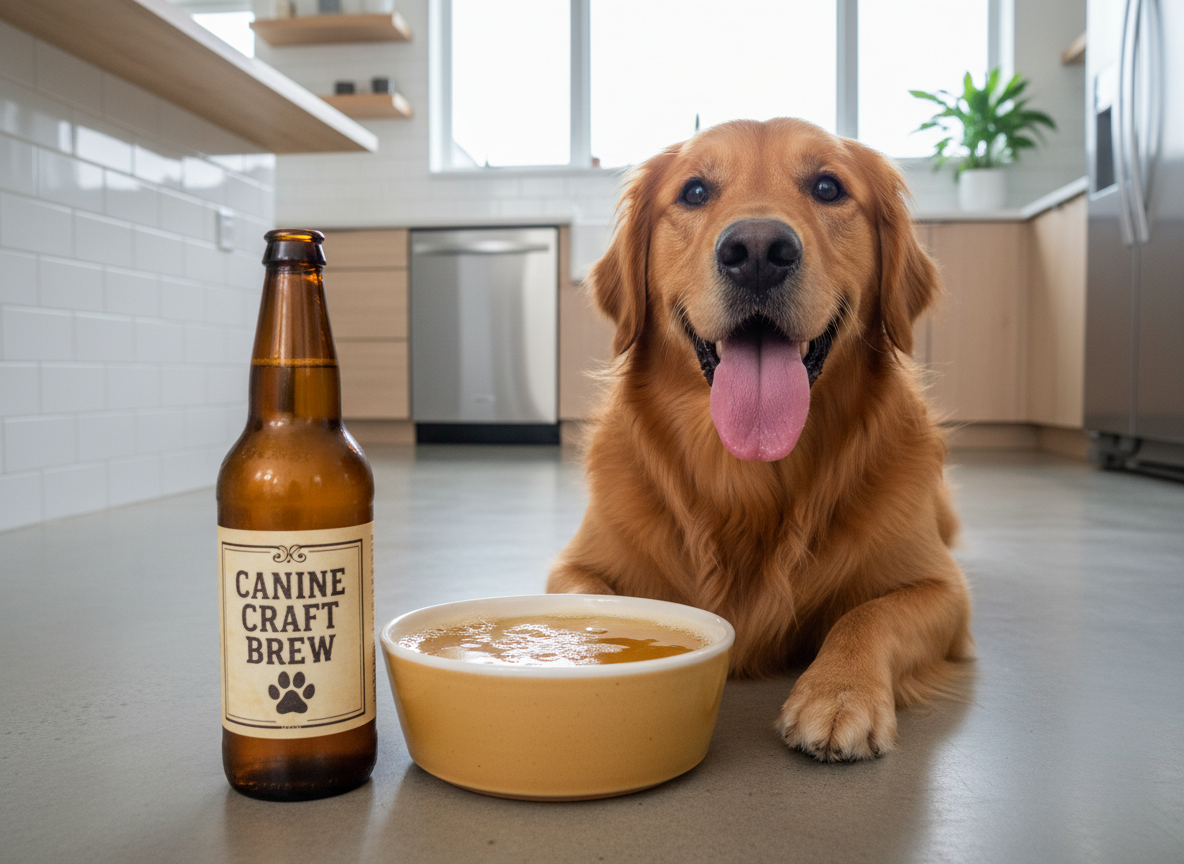
How to Make Non-Alcoholic Dog Beer With Bone Broth
Let’s get one thing straight: you should never give your dog actual beer. Alcohol is toxic to dogs, and the hops used in brewing are even more dangerous. Now that the public service announcement is over, let’s talk about the booming trend of ‘dog beer’—a non-alcoholic, sometimes carbonated, liquid treat marketed to discerning pet owners.
While the concept is fun, the execution from many commercial brands is a nutritional rip-off. You’re often paying a premium for cleverly marketed meat-flavored water. As the Canine Nutrition Hacker, my job is to show you how to bypass the marketing fluff and give your dog something genuinely beneficial. We’re not just making a treat; we’re crafting a superfood elixir. The secret weapon? Real, slow-simmered bone broth. This guide will provide the complete protocol for creating a safe, healthy, and cost-effective dog beer that will put any store-bought version to shame.
The Canine Nutrition Hacker’s Mandatory Safety Briefing

The Canine Nutrition Hacker’s Mandatory Safety Briefing
Before we touch a single ingredient, we need to establish the ground rules. Your dog’s safety is non-negotiable. I am a canine nutrition analyst, not a veterinarian. This recipe is for a supplemental treat or food topper only and should not be used as a meal replacement. It is not nutritionally complete on its own.
Critical Warnings: The ‘Never’ List
When you go rogue and start creating your own recipes, you must know the danger zones. The following ingredients are common in human foods and drinks but are toxic to dogs:
- Alcohol: Dogs are far more sensitive to ethanol than humans. Even small amounts can cause vomiting, disorientation, respiratory distress, and even death.
- Hops: An essential ingredient in human beer, hops are extremely toxic to dogs, leading to a dangerous spike in body temperature (malignant hyperthermia), seizures, and organ damage.
- Onions & Garlic: Both belong to the Allium family and contain compounds that damage a dog’s red blood cells, leading to anemia. While some commercial foods use trace amounts of garlic powder, it’s safest to avoid it entirely in homemade preparations.
- Xylitol: This artificial sweetener is a death sentence for dogs. It causes a rapid, life-threatening drop in blood sugar and can lead to acute liver failure. It is often hidden in products like peanut butter and broths. Always read the label.
- Excessive Salt: Commercial broths and stocks are often loaded with sodium, which can be harmful to dogs, especially those with heart or kidney conditions.
If your dog has any pre-existing health conditions, particularly kidney disease, pancreatitis, or specific food allergies, consult your veterinarian before adding anything new to their diet, including this dog beer.
Deconstructing Dog Beer: Why Bone Broth is the Ultimate Base Ingredient
Deconstructing Dog Beer: Why Bone Broth is the Ultimate Base Ingredient
The entire nutritional value of your dog beer hinges on its base. Most commercial products use a simple ‘beef broth’ or ‘chicken stock’ as their foundation. This is where they cut corners, and it’s where we excel.
Broth vs. Stock vs. Bone Broth: The Insider’s Knowledge
These terms are not interchangeable. Understanding the difference is crucial:
- Broth: Made by simmering meat (and sometimes a few bones) for a short period (under 2 hours). It’s thin, watery, and has minimal nutritional value beyond flavor.
- Stock: Primarily made by simmering bones with some meat for a moderate amount of time (4-6 hours). It has more body than broth due to some collagen extraction but is still a lesser product.
- Bone Broth: The gold standard. Made by simmering bones (especially joints and marrow bones) for a very long time—typically 12-24 hours—often with an acid like apple cider vinegar. This extensive simmering process breaks down the bones and connective tissues, releasing a powerful payload of nutrients into the liquid.
Hacker Tip: When you chill real bone broth, it should become gelatinous, like Jell-O. This is the visual proof that you’ve successfully extracted the collagen. If your cooled broth is still liquid, it’s just a stock.
The Nutritional Payoff of Real Bone Broth
By using a true bone broth base, you’re creating a treat that does more than just hydrate. You’re providing:
- Joint Support: It’s packed with naturally occurring glucosamine, chondroitin, and hyaluronic acid—the building blocks of healthy cartilage.
- Gut Health & Detox: The high concentration of the amino acid glycine helps protect and heal the gut lining and supports liver detoxification.
- Collagen Boost: Collagen is vital for healthy skin, coat, nails, and connective tissues.
- Hydration & Palatability: It’s a fantastic way to encourage picky or sick dogs to take in more fluids.
| Nutrient Source | Commercial Stock | True Bone Broth |
|---|---|---|
| Primary Benefit | Flavor & Hydration | Joint Support, Gut Health, Collagen |
| Collagen Content | Low to None | High (Gelatinous when cool) |
| Simmer Time | 2-6 Hours | 12-24+ Hours |
| Verdict | Nutritional lightweight | Nutrient-dense powerhouse |
The Ultimate DIY Dog Beer Recipe: A Step-by-Step Forensic Guide
The Ultimate DIY Dog Beer Recipe: A Step-by-Step Forensic Guide
This recipe is designed for maximum nutrient extraction and safety. We are adding specific, dog-safe ingredients to enhance the health benefits. Follow the protocol exactly for the best results.
Ingredient Analysis
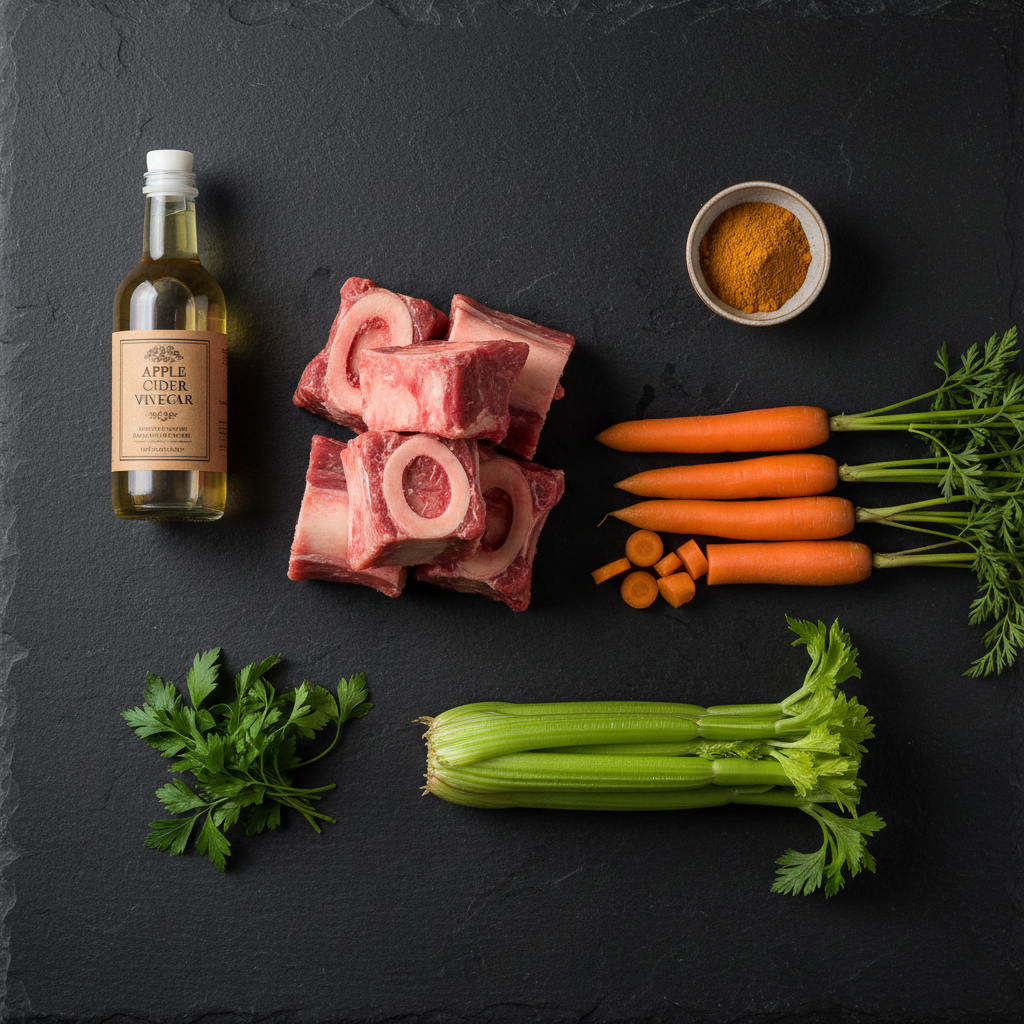
- 2-3 lbs Beef Marrow Bones or Knuckle Bones: The source of collagen, glucosamine, and minerals.
- 1 lb Chicken Feet (Optional but Recommended): An incredible source of joint-supporting compounds.
- 2 Tablespoons Apple Cider Vinegar: The acid helps pull the minerals from the bones into the broth.
- 1 Large Carrot, roughly chopped: Adds dog-safe flavor and beta-carotene.
- 1 Celery Stalk, roughly chopped: Provides vitamins and minerals.
- 1/2 Teaspoon Turmeric: A powerful natural anti-inflammatory.
- Small bunch of Parsley: Helps freshen breath.
- Filtered Water: Enough to cover the bones by about an inch.
The Equipment
- Large stockpot or slow cooker (8-quart or larger recommended)
- Fine-mesh strainer or cheesecloth
- Large bowl or second pot
- Glass jars or bottles for storage
The Protocol (Step-by-Step)
- Blanch the Bones: Place the beef bones in your pot and cover with cold water. Bring to a boil and cook for 20 minutes. This process removes impurities and results in a cleaner-tasting broth. Drain the bones and rinse them well.
- Roast for Flavor: For a deeper, richer flavor, roast the blanched bones on a baking sheet at 400°F (200°C) for 30 minutes. This step is optional but highly recommended.
- Combine Ingredients: Place the roasted bones, optional chicken feet, chopped carrot, and celery into your clean stockpot or slow cooker.
- Add Acid and Water: Add the apple cider vinegar and then pour in enough filtered water to cover everything by at least one inch.
- The Long Simmer: Bring the pot to a boil, then immediately reduce the heat to a very low simmer. You want to see only a few bubbles rising to the surface. Skim off any foam that appears in the first hour. Simmer for a minimum of 12 hours and up to 24 hours on the stovetop, or on low in a slow cooker. The longer the simmer, the more nutrients are extracted. Do not add salt.
- Add Herbs: During the last 30 minutes of cooking, add the parsley and turmeric.
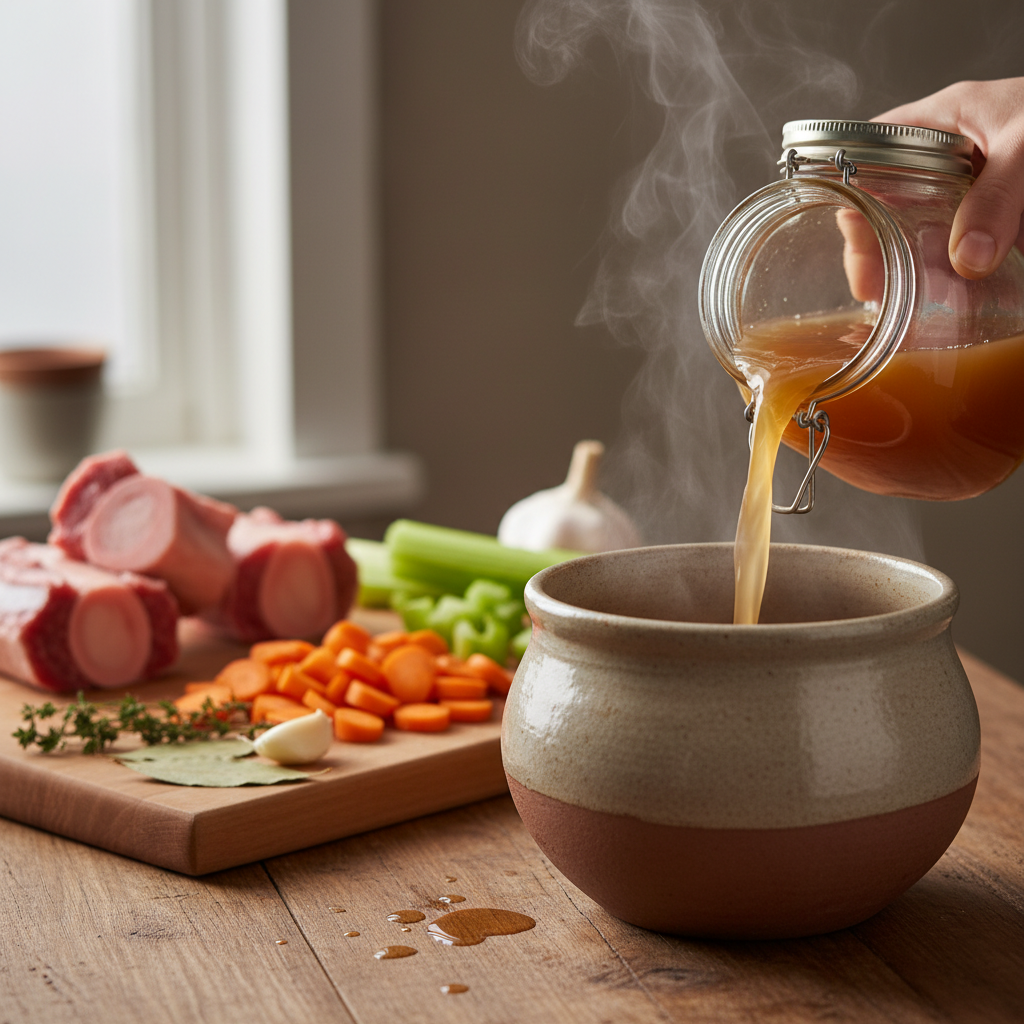
- Strain Carefully: Turn off the heat and let the broth cool slightly. Carefully remove the large bones and vegetables with tongs. Pour the remaining broth through a fine-mesh strainer or cheesecloth into a large bowl to remove all small solids. This is a critical safety step to ensure there are no cooked bone fragments.
- Cool and De-Fat: Allow the strained broth to cool to room temperature, then place it in the refrigerator for several hours or overnight. A hard layer of fat will form on the top. Skim this fat cap off and discard it. What remains below is your nutrient-dense, gelatinous bone broth.
- Serve the ‘Beer’: To serve, you can pour a small amount into a bowl as is. For a ‘frothy head,’ you can whisk it vigorously or blend a small portion with a splash of unsweetened coconut milk before serving.
Serving Size Recommendation
This is a rich treat. Start small. For a 50lb dog, a serving of 1/4 to 1/2 cup per day is a good starting point, either in their bowl or over their food.
Cost Analysis: Hacking Your Wallet with DIY vs. Store-Bought
Cost Analysis: Hacking Your Wallet with DIY vs. Store-Bought
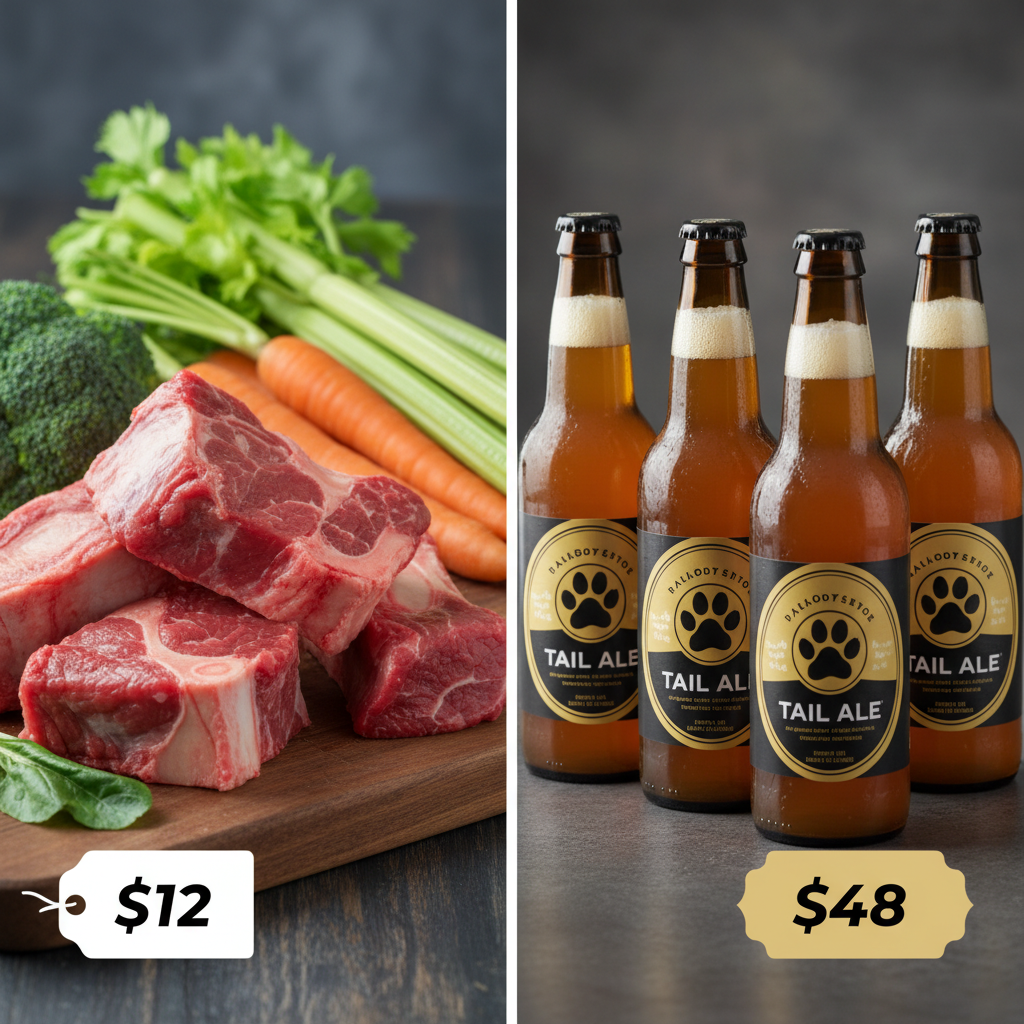
The boutique pet market preys on your love for your dog. A single 12oz bottle of commercial ‘dog beer’ or ‘bone broth’ can cost anywhere from $5 to $10. Let’s break down the actual cost of our superior homemade version.
| Item / Metric | DIY Cost (Approximate) | Premium Store-Bought Cost (Approximate) | The Hacker’s Verdict |
|---|---|---|---|
| Beef Bones (3 lbs) | $9.00 ($3/lb from a butcher) | N/A (Ingredient cost is hidden) | You control the quality of the primary ingredient. |
| Vegetables & ACV | $3.00 | N/A (Included in final price) | Fresh, whole food ingredients vs. powders and ‘natural flavors’. |
| Total Batch Cost (Yields ~64 oz) | $12.00 | $40.00 – $55.00 (for equivalent volume) | Astounding value difference. |
| Cost Per Ounce | ~$0.19 / oz | $0.62 – $0.85 / oz | DIY is 3 to 4.5 times cheaper. |
By investing a few hours of passive cooking time, you are not only producing a nutritionally superior product free from preservatives and fillers, but you are also saving up to 75% compared to premium retail brands. This isn’t just about saving money; it’s about redirecting your resources from marketing budgets to high-quality, foundational ingredients for your dog’s health.
The Pro Move: Batch Cooking and Strategic Storage
The Pro Move: Batch Cooking and Strategic Storage
A large batch of bone broth is your secret weapon for canine enrichment and meal enhancement. Proper storage is key to preserving its freshness and utility.
Refrigeration
Your finished bone broth can be stored in an airtight container (like a mason jar) in the refrigerator for 5-7 days. The gelatinous texture confirms its quality and freshness.
Freezing for Longevity
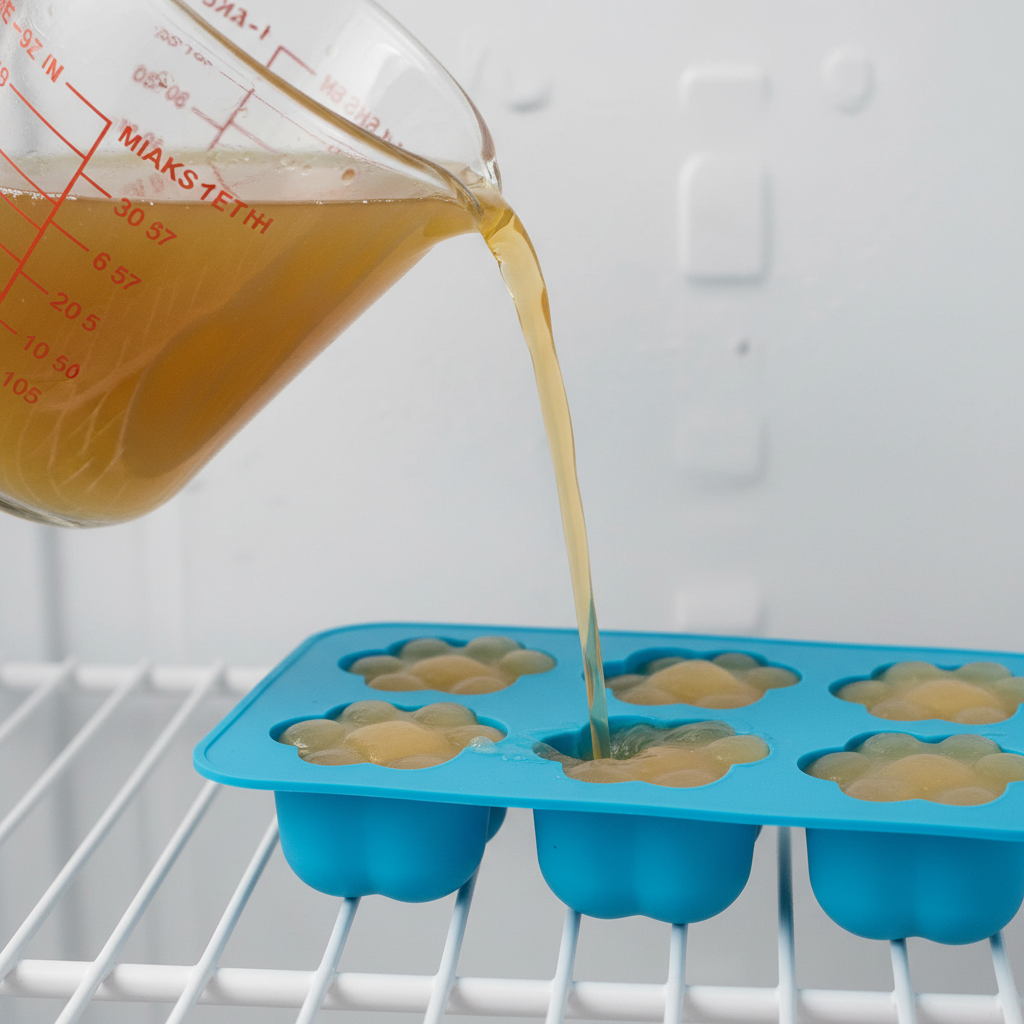
Freezing is the ultimate hacker move for long-term storage. The broth will last for up to 6 months in the freezer with no degradation in quality.
Hacker Tip: Don’t just freeze it in a large block. Pour the cooled broth into silicone ice cube trays for perfectly portioned servings. Use standard trays or get creative with paw-print or bone-shaped molds. Once frozen, pop the cubes out and store them in a freezer bag.
Creative Uses for Your Broth Cubes:
- Frozen ‘Beer-sicles’: A perfect cooling treat on a hot summer day.
- Meal Topper: Drop a frozen cube into your dog’s kibble. It will thaw and coat the food, adding moisture and incredible flavor.
- Rehydrating Agent: Use the broth instead of water to rehydrate freeze-dried or dehydrated dog food, adding a massive nutritional boost.
- Pill Pocket Alternative: For non-critical medications, you can partially thaw a cube and press a pill inside before re-freezing. (Check with your vet first).
By batching and freezing, you turn one cooking session into months of healthy, convenient, and cost-effective treats for your dog.
Conclusion
You now possess the knowledge to completely bypass the overpriced and often nutritionally-void commercial dog treat industry. By crafting your own non-alcoholic dog beer from a true bone broth base, you are taking ultimate control over your dog’s nutrition. You know every single ingredient, you’ve eliminated preservatives and fillers, and you’ve packed it with joint-supporting, gut-healing compounds that no store-bought product can match for the price.
This isn’t just a recipe; it’s a new mindset. Analyze labels, question marketing claims, and invest your time and money in foundational, whole-food ingredients. You have successfully hacked the system, providing your canine companion with a truly premium, healthy treat while keeping your wallet full. Now go share a ‘brew’ with your best friend—they’ve earned it.